

Wire your Can-Am rock lights in parallel using a fused battery feed controlled by a relay and switch. That keeps every light running independently, so one bad connection won’t kill the whole set, and it keeps the circuit protected from a short. Expect a typical installation to take a few hours using basic hand tools: lights, a relay, an inline fuse, a switch, and appropriate wire gauge to cover most four to six light setups.
TL;DR:
- Wiring rock lights in parallel ensures individual lights operate independently, preventing a failure in one fixture from disabling the entire set.
- Using a fused battery feed controlled by a relay protects the circuit from shorts and allows safe switching of multiple lights simultaneously.
- A typical six-light setup requires a 40A relay, proper wire gauge (14-16 AWG), and an inline fuse within 12-18 inches of the battery for reliable protection.
- Long wiring runs over 15 feet may require heavier gauge wire to compensate for voltage drop, especially when using RGB controllers that draw more current.
- Proper grounding to clean, metal contact points and correct fuse and relay placement are crucial to prevent troubleshooting delays and ensure circuit longevity.
Table of Contents
- Parts, Tools, and Pre-Install Checklist for Can-Am Rock Light Wiring
- Should You Wire Rock Lights in Parallel or Series?
- How to Wire and Install Rock Lights on a Can-Am Step by Step
- What Fuse and Wire Gauge Do Rock Lights Need?
- Where to Mount and Route Rock Light Wiring on a Can-Am
- How Do You Troubleshoot Rock Lights That Won’t Turn On?
- Why Wheellightexpress Harnesses Simplify a Can-Am Install
- Common Mistakes That Slow Down a Rock Light Install
- Get a Kit That’s Already Wired Right
- Sources
Parts, Tools, and Pre-Install Checklist for Can-Am Rock Light Wiring
Before you cut a single wire, lay out every part on the workbench and confirm it matches your light count and mounting locations. A rushed parts run mid-install is how afternoons turn into weekends.
Here’s what a typical four to six light setup needs:
- Rock lights rated IP67 or IP68, since anything less won’t survive mud and creek crossings.
- A 40A relay (standard Bosch style, five-pin) sized for the total draw plus headroom.
- An inline fuse and holder, rated to your calculated amperage plus a safety margin.
- A dash or panel-mount switch, or an existing factory accessory circuit if your Can-Am has one.
- Ring terminals, heat-shrink butt connectors, and sealed weatherproof connectors for every splice.
- 14 to 16 AWG primary wire for the light runs, with heavier gauge for longer battery-to-relay feeds.
Optional upgrades worth considering: an RGB controller if you’re running color-changing lights, or a prewired busbar harness that distributes power to each light from a single fused source instead of daisy-chained splices.
Before drilling anything, check your battery’s charge and terminal condition, confirm whether your Can-Am has a factory accessory bus you can tap, and dry-fit each light in its mounting spot to make sure the wire length you bought actually reaches.
Should You Wire Rock Lights in Parallel or Series?
Parallel wiring is the standard for rock lights, and for good reason. In a parallel circuit, each light gets its own direct connection to power and ground, so a failed light, a corroded connector, or a pinched wire only takes out that one fixture. Forum discussions among installers consistently favor parallel setups for exactly this reason, especially once a controller enters the picture.
Series wiring, where lights share a single loop of power and ground, is rarely worth the risk. One loose connection anywhere in the chain drops the whole string. Daisy-chaining, where you run one power and one ground wire from light to light rather than a wire to each light, only works if your kit and wiring are rated for the combined amperage draw of every light on that run. If you’re not certain of the rating, wire the array in parallel and skip the guesswork.
Adding an RGB controller changes the math. Controllers draw their own current, and the Bushdoof Lighting installation guide notes that some controllers reset or flicker under voltage drop, so plan for slightly thicker gauge wire and a stable ground than the controller’s nominal draw might suggest.
Here’s how the circuit maps out from battery to light:
| Stage | Connection | Component |
|---|---|---|
| 1 | Battery positive | Fused feed (inline fuse within 12 to 18 inches of battery) |
| 2 | Fused feed | Relay terminal 30 |
| 3 | Relay terminal 87 | Distribution point to each light’s positive lead |
| 4 | Relay terminal 86 | Switched ignition or dash switch |
| 5 | Relay terminal 85 | Chassis ground |
| 6 | Each light’s negative lead | Nearest clean chassis ground point |
Terminals 30 and 87 carry the switched high-current load to your lights. Terminals 85 and 86 form the low-current trigger side that the switch controls, which is why a cheap dash rocker can safely fire a relay handling 20 amps or more of lighting load.
How to Wire and Install Rock Lights on a Can-Am Step by Step
- Disconnect the battery. Pull the negative terminal first. This single step prevents the accidental short that ruins more rock light installs than any other mistake.
- Test-fit and mark mounting points. Hold each light against its intended spot, check clearance from the ground and suspension travel, and mark your holes or adhesive placement before committing.
- Clean the mounting surfaces. Degrease metal frame rails or skid plate areas so adhesive-backed lights bond properly and drilled holes don’t chip paint further than necessary.
- Route your wire runs first. Push wire through frame rails, existing grommets, or behind body panels before you terminate a single connector. It’s far easier to adjust a bare wire than one with a crimped end already attached.
- Secure the wire every 12 to 18 inches with zip ties or wire clips, and slide split loom over any section exposed to rocks, mud, or moving suspension components.
- Mount the relay in a dry, accessible spot near the battery or under the dash, then wire the fused battery feed to terminal 30.
- Install the inline fuse within 12 to 18 inches of the battery, following the step-by-step process outlined by Bliauto, since a fuse mounted too far downstream leaves unprotected wire between the battery and the fuse itself.
- Run terminal 87 to your distribution point and branch a positive lead out to each light.
- Wire terminal 86 to your switch, and terminal 85 to a clean chassis ground.
- Ground each light to the nearest solid, paint-free metal point, using a ring terminal and star washer for a tight bite.
- Reconnect the battery and test every light before final mounting or sealing.
Pro Tip: Test the entire circuit on the bench, or at least with lights loosely hanging, before you commit to final mounting and sealant. It’s much easier to fix a reversed polarity or a bad crimp when the light is dangling free than after it’s bolted down and sealed with dielectric grease.
If your Can-Am has a factory accessory switch panel or an unused bus position, tapping it can save you a dash cutout. Check your wiring diagram and color codes first, since accidentally tapping a critical circuit like your ECU or fuel pump feed instead of a dedicated accessory line causes problems that are far harder to diagnose than a rock light that won’t turn on.
What Fuse and Wire Gauge Do Rock Lights Need?
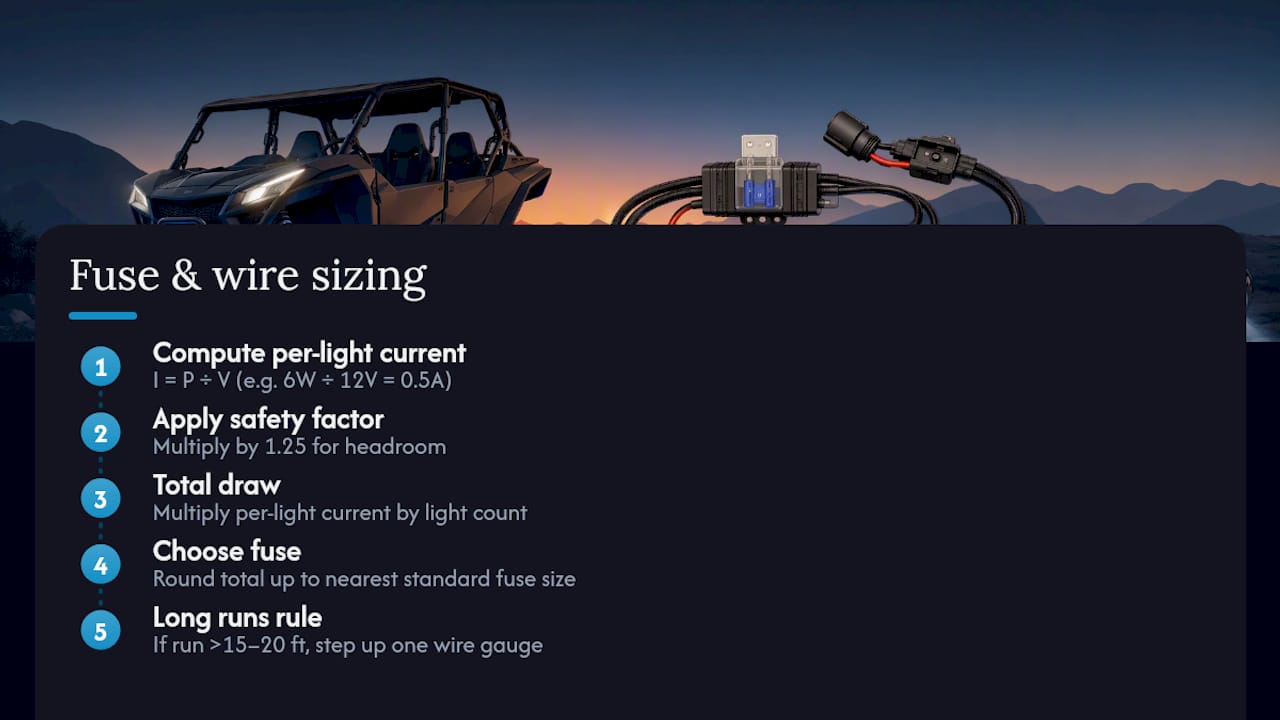
The sizing math is simple: current (I) equals power (P) divided by voltage (V), then multiply by 1.25 for a safety factor that accounts for voltage sag and connector resistance.
For a 6-watt light on a 12-volt system, that’s 6 divided by 12, or 0.5 amps per light, times 1.25 for headroom. Multiply by your light count to get total draw, then round up to the nearest standard fuse size.
These figures, drawn from Bliauto’s installation sizing guidance, assume short to moderate wire runs. Long runs from a rear-mounted battery to front-corner lights lose voltage over distance, so if your run exceeds roughly 15 to 20 feet, step up one wire gauge to compensate. Wheellightexpress covers this in more depth in a dedicated guide on choosing off-road light wire gauge, and you can double-check your fuse math against the breakdown on sizing fuses for LED lighting.
Where to Mount and Route Rock Light Wiring on a Can-Am
Mount lights on solid metal backing wherever possible. Adhesive-backed mounts work fine on flat, clean surfaces if you’d rather skip drilling, but a bracket bolted through metal holds up better under sustained washboard vibration.
Route wiring inside frame rails, behind bumpers, and through existing OEM grommets rather than across exposed surfaces where rocks and debris can shred insulation in a single hard hit. Keep every run well clear of the exhaust and suspension components; heat cycling and rubbing wear through wire jacketing faster than most owners expect.
- Use rubber grommets anywhere wire passes through drilled sheet metal, since bare metal edges will eventually saw through insulation.
- Seal every connector with dielectric grease or heat-shrink, and stick to IP67 or IP68-rated fixtures for anything mounted below the frame rail.
- Check for local restrictions on colored or forward-facing underbody lighting if you plan to run these lights on public roads, and wire in a way that lets you kill them easily when you’re not off-road.
Wheellightexpress has a separate breakdown on best rock light placement if you want more detail on protecting fixtures from rock strikes without sacrificing beam coverage.
How Do You Troubleshoot Rock Lights That Won’t Turn On?
Start at the fuse and work outward. A dead fuse or a relay that won’t click is behind most no-power complaints, and both take thirty seconds to check with the panel open.
- Check the inline fuse first. A blown fuse means something drew more current than expected, so inspect for a pinched wire or short before replacing it.
- Listen for the relay click when you flip the switch. No click usually means a bad ground on terminal 85 or no trigger voltage reaching terminal 86.
- Test voltage at relay terminal 30 and at each light’s positive lead with a multimeter, under load, to confirm power is actually reaching the fixture rather than stopping somewhere in the harness.
- Suspect the ground first if only some lights work. A loose or corroded chassis ground is the single most common failure point in DIY rock light installs, more common than bad lights or blown fuses combined.
- Carry spare fuses and a few crimp connectors on the trail. Vibration loosens crimped connections over time, and a five-minute roadside fix beats a tow.
If you’ve checked fuse, relay, ground, and voltage at the light and still have no output, the light itself may be dead. Waterproof rock lights fail less often than the wiring around them, but it happens.
Why Wheellightexpress Harnesses Simplify a Can-Am Install
Wheellightexpress designs its harnesses and rock light kits in Louisiana, not overseas, which means the wire gauge, connector types, and fuse placement in a 4-piece rock light kit are matched from the start instead of left for you to guess at. A preterminated wire harness enforces the correct gauge and a fused feed automatically, so the parallel wiring pattern covered above is already built into the harness rather than something you have to engineer from loose spools of wire.
Common Mistakes That Slow Down a Rock Light Install
Label every wire before you route it. It sounds unnecessary until you’re under the vehicle an hour later trying to remember which lead goes to which corner. Pre-routing with fish tape before you terminate connectors saves rework, and testing the full circuit before final sealing catches a reversed polarity while it’s still a two-minute fix.
The mistakes I see most often: grounds bolted to painted metal instead of bare metal, fuses mounted three feet from the battery instead of within the recommended 12 to 18 inches, and installers assuming a four-light kit draws next to nothing when an RGB controller on top of it pushes the real number well past that estimate. Budget an afternoon, and keep a handful of spare crimp connectors and an extra fuse in the glovebox.
— Christopher
Get a Kit That’s Already Wired Right
Skip the guesswork on connectors and fuse placement. Wheellightexpress builds its rock light kits and harnesses in Louisiana with the gauge, fusing, and sealed connectors already matched to the job, so you’re not standing at a parts counter trying to reverse-engineer what a random online diagram assumed you’d buy.

The 4-piece rock light kit covers the most common Can-Am setup with lights, mounting hardware, and a harness sized to match. If you already have lights and just need the electrical side sorted, the wire harness leads give you a preterminated, correctly fused feed instead of a spool of bulk wire and a bag of connectors. Running a larger array or replacing a damaged factory harness? The replacement wire harness option is built for exactly that. Every order comes backed by a satisfaction guarantee, and financing is available if you’d rather spread the cost than pay it all up front. Pick the harness sized for your light count, confirm it includes an inline fuse, and check out when you’re ready to get your rig lit properly.
Sources
- Rock light wiring: series vs parallel (forum discussion)
- SSV 2019 wiring diagram (Can‑Am / SSV schematic) — Scribd
- Rock light installation guide — Bushdoof Lighting