

For any 12V LED installation, the rule is straightforward: divide total wattage by voltage to get current (I = W / V), multiply that result by 1.25 for continuous loads, then round up to the next standard fuse size. A 48W LED strip at 12V draws a current that requires sizing up to a fuse rated a bit above that to ensure protection. The fuse goes on the positive lead, within about 6 inches (15 cm) of your battery or power source.
That formula covers the vast majority of automotive LED installs, from short accent strips to full light-bar setups. The fuse is there to protect your wiring, not the LED itself. If the wire overheats before the fuse blows, you have a fire risk, not just a dead light. Keep that distinction in mind throughout every step below.
- Step 1: Add up total LED wattage
- Step 2: Divide by system voltage (I = W / V)
- Step 3: Multiply by 1.25 (continuous-load margin)
- Step 4: Round up to the next standard fuse size
- Step 5: Place the fuse within 6 in (15 cm) of the positive terminal
Key Takeaways
The single most important rule in LED fuse selection: calculate operating current with I = W / V, apply a 1.25 continuous-load margin, and always round up to the next standard fuse size matched to your wire’s ampacity.
| Point | Details |
|---|---|
| Core calculation | I = W / V, then multiply by 1.25 and round up to the next standard fuse size. |
| Fuse protects the wire | Size the fuse to the wire’s ampacity, not to the LED’s wattage, to prevent conductor overheating. |
| Placement within 6 inches | Mount the fuse on the positive lead within 15 cm (6 in) of the battery or power source. |
| Match wire gauge to current | Use — for up to 15 A, 12 AWG for up to 20 A; keep voltage drop at or below 3% of supply voltage. |
| Wheellightexpress harnesses | Pre-fused wire harnesses designed and assembled in Louisiana, sized for common automotive LED loads. |
Table of Contents
- How do you calculate the right fuse size for LED lights?
- Quick reference: common LED scenarios and recommended fuse sizes
- Why the fuse protects your wire, not the LED
- How to match wire gauge to current and keep voltage drop in check
- Which fuse types work best for LED installations?
- Common mistakes and how to troubleshoot blown fuses or dim LEDs
- Understanding the assumptions and rounding rules behind the calculation
- An installer’s perspective on what the formula doesn’t tell you
- Ready-made harnesses and fuses from Wheellightexpress
- Sources
How do you calculate the right fuse size for LED lights?
The math is simple, but each step matters. Here is the full process with worked examples.
The core formula
I (amps) = Power (watts) ÷ Voltage (volts)
Once you have operating current, apply the 125% continuous-load margin — multiply I by 1.25. LEDs run continuously, meaning they draw steady current the entire time they are on. A fuse rated exactly at operating current will eventually fatigue and blow from thermal cycling. The 1.25 multiplier prevents that while still protecting the wire.
Always round up to the next standard fuse size after applying the margin. Standard blade fuse sizes in automotive use are: 1, 2, 3, 5, 7.5, 10, 15, 20, 25, 30, 40 A.
Three worked examples
1. Short LED accent strip (24W, 12V)
- I = 24 ÷ 12 = 2 A
- 2 × 1.25 = 2.5 A
- Round up → 3 A fuse
2. Single LED light bar (120W, 12V)
- I = 120 ÷ 12 = 10 A
- 10 × 1.25 = 12.5 A
- Round up → 15 A fuse
3. Multi-pod setup: four 30W pods in parallel (120W total, 12V)
- Sum wattages first: 4 × 30 = 120W
- I = 120 ÷ 12 = 10 A
- 10 × 1.25 = 12.5 A
- Round up → 15 A fuse
For parallel loads, always sum the wattages before dividing. Each branch circuit can carry its own smaller fuse, with a master fuse on the feed wire sized to the total load. Series wiring is uncommon in automotive LED installs because a single failure kills the whole run, but if you use it, the current through the circuit equals the current of one LED, not the sum.
Pro Tip: If your LED driver or controller has a significant inrush current at startup, use a slow-blow (time-delay) fuse rather than a fast-acting one. Fast-acting fuses can blow on the startup surge even when the steady-state current is well within rating. Check the driver datasheet for peak inrush specs before choosing.
Quick reference: common LED scenarios and recommended fuse sizes
All values assume 12V DC unless noted. Use these as a starting point and always verify against your specific product’s datasheet. For vehicle driving lights, a wattage-to-fuse chart confirms these figures as field shortcuts.
For 24V systems, the same wattage draws roughly half the current of a 12V system. That directly affects fuse size, which is why specifying your system voltage before selecting any fuse matters.
Why the fuse protects your wire, not the LED
This is the most misunderstood point in LED wiring. The fuse does not protect the LED from burning out. It protects the conductor from carrying more current than its insulation can handle safely.
Fuses are designed to blow before wiring overheats. Their nominal I²t rating (measured in A²s) determines how much pulse energy they absorb before opening the circuit. If you install a fuse rated higher than the wire’s ampacity, a short circuit or overload will heat the wire to the point of insulation failure before the fuse reacts. That is how automotive fires start.
Safety checklist for every LED install:
- Fuse amperage must not exceed the ampacity of the wire it protects
- Use a fuse rated at or above the system voltage (12V or 24V automotive fuses are rated for 32V DC, which covers both)
- Mount the fuse holder securely; a loose holder creates resistance and heat
- Check for exposed conductors at every connector and terminal before powering on
- Verify the fuse holder is rated for the current you are running through it
Placement rule: The fuse goes on the positive lead, as close to the battery or power source as physically possible. The recommended maximum distance is about 15 cm (6 inches). The unfused section of wire between the battery and the fuse is the most vulnerable point in the circuit. Keep it short.
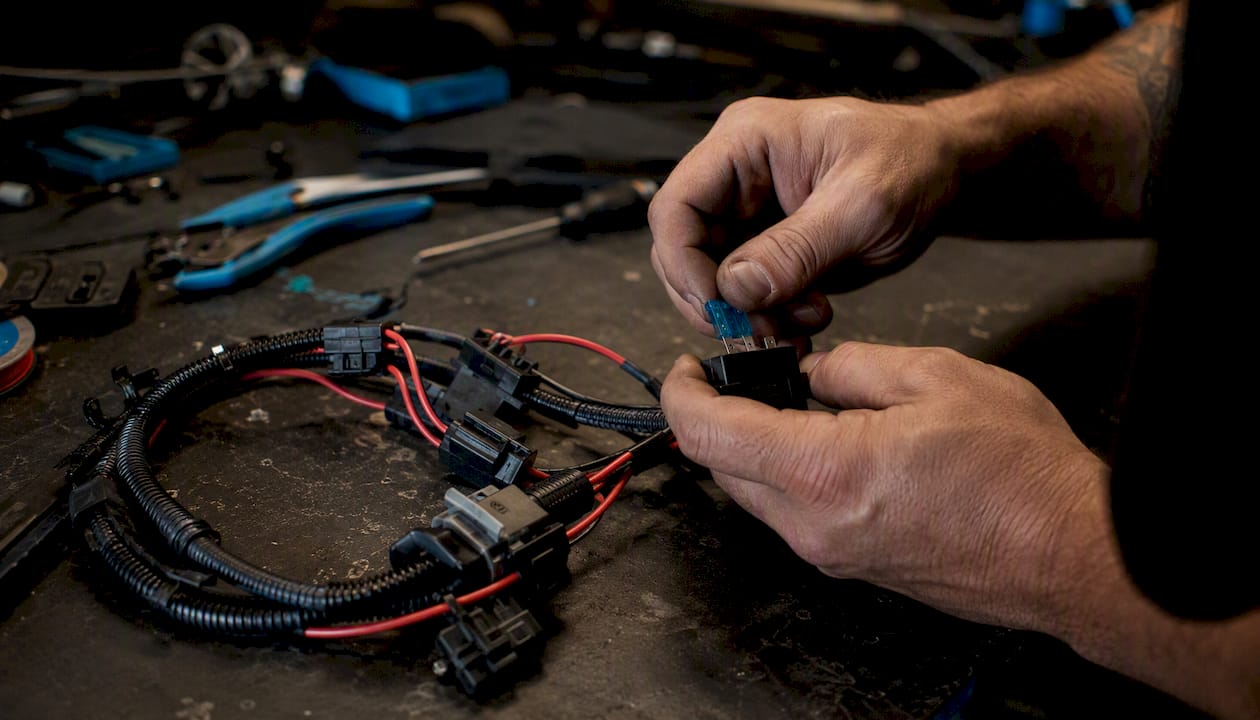
Pro Tip: For most automotive LED installs, an in-line blade fuse holder (ATO or MINI format) is the standard choice. If you are running multiple LED circuits from a single feed, a fused distribution block keeps things organized and gives each branch its own protection. Wheellightexpress wire harnesses are built with this in mind, with pre-fused branches sized for common LED loads.
How to match wire gauge to current and keep voltage drop in check
Choosing the right fuse size is only half the job. The wire carrying that current has to handle it without overheating or dropping voltage enough to dim your LEDs.
Wire gauge must be compatible with the chosen fuse; the conductor’s ampacity sets the ceiling. A 15 A fuse on 18 AWG wire is a fire hazard because 18 AWG is typically rated for around 7–10 A in chassis wiring. The fuse must be sized to the wire, not the other way around.
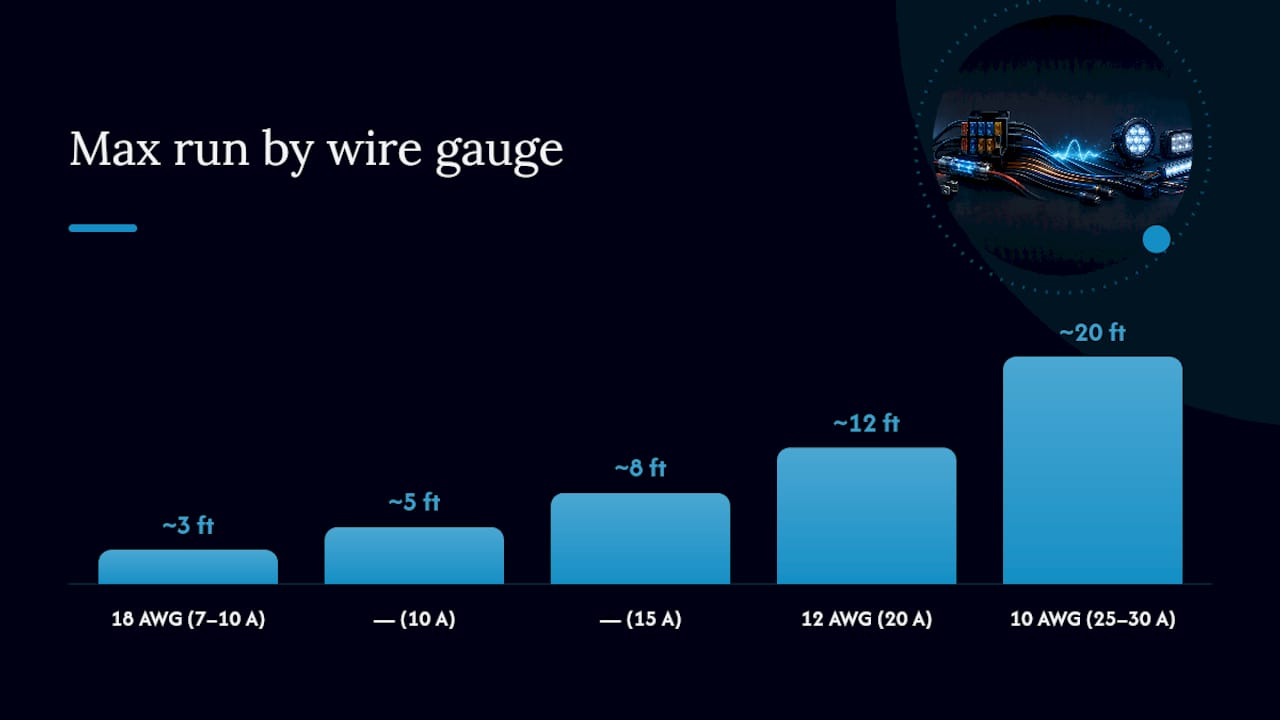
On a 12V system, that means no more than 0.36V lost across the run. Longer runs and thinner wire both increase resistance and drop.
| AWG | Safe Ampacity (chassis wiring) | Recommended Fuse Max | Typical Max Run (3% drop, 12V, 10A load) |
|---|---|---|---|
| 18 AWG | 7–10 A | 7.5 A | ~3 ft |
| — | 10 A | 10 A | ~5 ft |
| — | 15 A | 15 A | ~8 ft |
| 12 AWG | 20 A | 20 A | ~12 ft |
| 10 AWG | 30 A | 25–30 A | ~20 ft |
For long LED strip runs, voltage drop is a real problem. Installers handle it two ways: increase conductor size, or inject power at intervals along the strip. Power injection means running a fresh positive and negative feed to the midpoint or far end of the strip, rather than powering everything from one end. Each injection point needs its own fuse on the positive feed.
Bundled conductors trap heat and reduce the effective current capacity of each wire in the bundle.
Which fuse types work best for LED installations?
The physical format and internal construction of a fuse both matter. Here is what you will encounter in automotive and hobbyist LED work.
Common fuse formats:
- ATO/ATC blade fuses: The standard for most automotive circuits up to 40 A. Widely available, easy to replace, and compatible with most in-line holders and fuse blocks.
- MINI blade fuses (ATM): Physically smaller than ATO; used in late-model vehicles and compact fuse blocks. Same electrical ratings, just a different footprint.
- Maxi blade fuses (APX): For high-current feeds, typically 40–120 A. Use these on the main feed wire for large light bars or multi-circuit distribution blocks.
- Glass cartridge fuses: Less common in modern automotive work but still found in older vehicles and some aftermarket accessories. Harder to source in a pinch.
- Flat fuses (PAL/JCASE): Found in OEM fuse boxes on many late-model trucks and SUVs. If you are tapping into an existing circuit, you may encounter these. A 20A flat fuse is a common size for mid-draw LED branches.
Slow-blow vs. fast-acting:
Fast-acting fuses open almost instantly at their rated current. They are correct for circuits without significant inrush, such as a simple resistive or constant-current LED strip. Slow-blow (time-delay) fuses tolerate brief current spikes before opening. Use them when your LED driver or controller produces a startup surge. Fuse I²t and surge behavior vary by construction, so matching fuse type to driver behavior prevents nuisance blows without sacrificing protection.
Always use a fuse with a voltage rating at or above your system voltage. Standard automotive blade fuses are rated for 32V DC, which covers both 12V and 24V systems comfortably.
Common mistakes and how to troubleshoot blown fuses or dim LEDs
Most LED wiring problems trace back to a handful of repeatable errors.
Mistakes that cause failures:
- Installing a fuse rated higher than the wire’s ampacity (the wire becomes the fuse)
- Placing the fuse more than 6 inches from the battery, leaving a long unprotected wire
- Running no fuse at all on a direct battery connection
- Using undersized wire for the current draw, causing voltage drop and heat
- Choosing a fast-acting fuse on a circuit with driver inrush, causing nuisance blows
- Skipping a ground check, then chasing a phantom fault through the positive side
Troubleshooting a blown fuse:
- Do not replace the fuse until you know why it blew. A fuse that blows immediately on replacement points to a short, not a marginal overload.
- Disconnect the LED load entirely and inspect the wiring for pinched insulation, bare conductors touching chassis, or a connector that has backed out and shorted.
- Reconnect the load and install a correctly rated fuse. If it holds, the original fuse was undersized or fatigued.
- If the fuse blows again with the load connected, isolate each branch one at a time to find the fault.
Dim LEDs are not always a fuse problem. Voltage drop from undersized wire, a poor ground connection, or a current-limiting driver in thermal protection mode all cause dimming without blowing a fuse. Measure voltage at the LED end of the run under load. If you see more than 0.36V below supply voltage on a 12V system, the wire or ground is the issue. For professional electrical diagnosis, an automotive electrical specialist can help you trace intermittent faults quickly.
For intermittent faults, resist the urge to keep swapping fuses. Instead, do a visual inspection of every connector, run a continuity check on the ground path, and isolate sections of the circuit one at a time. A clamp meter on the positive feed tells you the actual current draw, which confirms whether the fuse rating is correct.
Understanding the assumptions and rounding rules behind the calculation
It reflects the behavior of LEDs as a continuous load, meaning they draw steady current for extended periods rather than cycling on and off rapidly. Fuses sized exactly at operating current will eventually fatigue under that sustained thermal stress.
The assumptions behind the rule:
- Copper conductors in typical automotive ambient temperatures (up to about 60°C in most under-hood or interior locations)
- Single-source feeds, not bundled multi-conductor runs in high-heat zones
- Steady-state LED current, not pulsed or dimmed loads where average current is lower
When to deviate from 1.25: If your installation runs in a high-ambient-heat area, through a conduit with other wires, or uses a driver with significant inrush, apply a larger margin or consult the manufacturer’s wiring guide. Lumitec’s fuse selection reference uses a 1.4 safety factor for marine and commercial applications. For most hobbyist automotive LED strips, 1.25 is the standard, but knowing that 1.4 exists gives you a conservative fallback for demanding installs.
Rounding rules, stated plainly:
- 4.33 A calculated → next standard size up → 5 A fuse
- 12.5 A calculated → next standard size up → 15 A fuse
- 18.75 A calculated → next standard size up → 20 A fuse
Never round down. A fuse that is one size too small will nuisance-blow; a fuse that is one size too large may allow the wire to overheat before it opens. Round up, confirm the wire ampacity supports that fuse size, and you are protected.
Pro Tip: For marine or ABYC-compliant vehicle builds, the 1.25 multiplier is a minimum, not a target. ABYC E-11 guidance for marine wiring recommends that fuses not exceed the ampacity of the wire they protect, and some installers apply a 1.4 factor as a conservative baseline. If your truck or off-road rig sees water crossings or extreme heat, treat your wiring like a marine install.
An installer’s perspective on what the formula doesn’t tell you
The formula gives you the right number. What it does not give you is the habit of checking the actual number on the product label before you trust your calculation.
LED strip wattage ratings are nominal. A strip labeled “60W per 5 meters” may draw 58W or 64W depending on the batch, the supply voltage, and the ambient temperature. Measure actual current with a clamp meter after installation, under real operating conditions, before you call the job done. If the measured current is higher than your calculated value, resize the fuse accordingly.
Grounding deserves as much attention as fuse selection. A poor ground connection creates resistance, which causes voltage drop and heat at the terminal, not at the fuse. The fuse will not blow, but the LED will dim and the terminal will eventually fail. Use a dedicated ground point on the chassis, not a shared bolt with other accessories, and verify continuity from the LED negative terminal to the battery negative post.
Strain relief is the detail most DIYers skip. Wire that flexes repeatedly at a connector will eventually crack the conductor inside the insulation, creating an intermittent open or a high-resistance fault that is nearly impossible to find with a simple voltage check. Secure every wire run with clips or loom, and leave a small service loop at each connector so the wire is never under tension.
Quality fuse holders matter more than most people expect. A cheap in-line holder with thin contacts will add resistance to the circuit and can arc internally under load.
Ready-made harnesses and fuses from Wheellightexpress
Calculating fuse size is straightforward once you know the formula. Sourcing the right hardware is where installs stall out.

Wheellightexpress designs and assembles wire harnesses for LED lighting right here in Louisiana, sized for the real-world loads that truck owners and off-road builders actually run. Each harness is built with pre-fused branches so you are not guessing at fuse placement or wire gauge. For a complete kit, the replacement harness for all lighting covers the most common automotive LED configurations with the correct fuse ratings already matched to the conductor size. Need replacement fuses or self tappers? The self tappers and fuses product page has the specific sizes used in Wheellightexpress kits. Every order comes with a satisfaction guarantee, and our team is available to answer installation questions before you buy. Check the product page for fuse ratings before your install, and reach out if your setup falls outside the standard configurations.
Sources
The calculations and guidance in this article draw from the following references. Consult them for deeper technical detail and to verify specs for your specific installation.
- Covertitall
- Design considerations in fuse selection (Littelfuse application note)
- Fuse Selection - Quick Reference - Support Center
- What Size Fuse for LED Driving Lights? A Complete Guide With Chart
- What Size Fuse for 12V LED Lights? A Comprehensive Guide – Circuits Gallery
Always cross-reference your product’s datasheet and manufacturer installation notes as the final check before powering up any new circuit.