

The best lighting setups for show trucks are defined by zone-based planning and high-performance lensed optics working together to create a visually striking, durable display. A truck with random lights bolted on looks amateur. A truck built around the five primary lighting zones, with quality LED components in each, looks like it belongs on a show stage. This guide covers the top configurations, component selection, and installation practices that separate a truly impressive show truck from the rest.
What are the best lighting setups for show trucks?
Industry standards define five primary lighting zones for show trucks: fog/dust, peripheral, primary driving, distance, and ground. Each zone serves a specific visual and functional purpose. Skipping a zone leaves a visible gap in your truck’s lighting profile, and judges and spectators notice.
The layered lighting approach is the foundation of every top-tier show truck build. You start with primary driving lights, then build outward to peripheral lights, and finish with ground illumination through rock lights. This sequence creates depth and dimension that flat, single-zone setups simply cannot match.
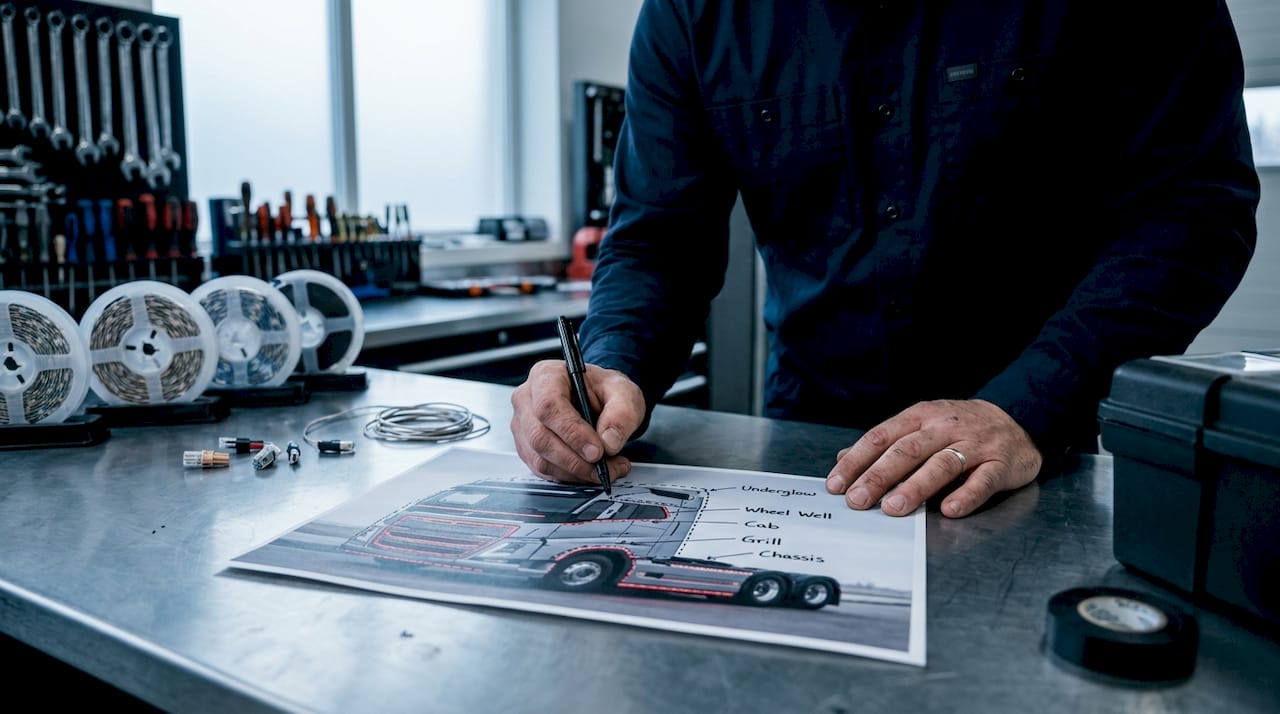
Pro Tip: Map your five zones on a printed photo of your truck before buying a single light. This prevents duplicate coverage in one area and dark zones in another.
Here is how each zone functions in a complete show truck lighting strategy:
| Zone | Light Type | Primary Role |
|---|---|---|
| Fog/dust | Amber fog lights | Low-level forward scatter |
| Peripheral | Side marker lights, watermelon lights | Lateral visibility and accent color |
| Primary driving | Light bar, headlights | Core forward illumination |
| Distance | Spot or pencil beam lights | Long-range forward reach |
| Ground | Rock lights, underbody pods | Underbody glow and wheel well fill |
1. Peterbilt-style 12-light air cleaner bracket setup
The 12-light air cleaner bracket setup creates a denser, more continuous lighting effect across the front air cleaner area than an 8-light layout. The additional four lights eliminate the gaps that make 8-light setups look sparse at shows. Amber dual-function LED GLO-style watermelon lights are the standard choice for this configuration.
This setup works best on Class 8 trucks and Peterbilt-style builds where the air cleaner bracket is a focal point. The visual payoff is a full, unbroken arc of amber light that reads clearly from 100 feet away.
2. Rock light underbody pod system
Professional builds use two rock lights per wheel well to eliminate dark zones beneath the truck. A standard four-wheel truck needs 8 total pods for complete underbody coverage. Angling each pod downward and forward reduces shadow pockets while keeping the light spread even.
The underbody glow effect turns a parked show truck into a rolling light show, even standing still. This setup is one of the highest-impact additions per dollar spent on a show truck build.
Pro Tip: Leave extra wire slack at each pod mount point. Lifted trucks with suspension travel will snap tight wiring on the first articulation.
3. Combo-beam light bar at bumper height
Combo-beam light bars with a spot center and flood edges provide versatile forward illumination. Mounting height of 24–36 inches at the bumper or grille reduces glare and maximizes ground coverage. This is the foundation light for the primary driving zone on any full-size show truck.
A single 40-inch or 50-inch combo bar across the bumper fills the primary driving zone completely. Pair it with a spot beam bar on the roof for distance coverage and you have two zones handled with two clean, symmetrical installs.
4. Dual-color watermelon light peripheral array
Dual-bank LED watermelon lights with tempered-glass lenses eliminate center dark voids and maintain high color fidelity over years of use. Mass-market versions use plastic lenses that yellow within one season. Tempered-glass lenses and machine-built tolerances keep color separation sharp and consistent.
Amber and blue dual-color watermelon lights are the most popular combination for peripheral zone coverage on show trucks. Running them as marker lights with a signal function adds a practical layer to a purely aesthetic component.
5. Wheel well accent lighting with LED strips
Wheel well lighting fills the peripheral zone from below and draws attention to lifted suspension and large tires. LED strips mounted inside the wheel arch create a halo effect around each tire that photographs exceptionally well. Lensed optics produce a neon-like continuous effect preferred for show trucks, while open SMD strips appear dotted and degrade faster.
For lifted trucks, the wheel well is a natural focal point. Lighting it properly with quality LED strips tied to the lighting layering technique makes the lift height look intentional and polished rather than functional-only.
6. Roof-mounted spot beam array for distance zone
A roof-mounted row of spot beam pods handles the distance zone and adds vertical height to your truck’s lighting profile. Four to six pods evenly spaced across a roof rack or cab roof creates a symmetrical look that reads well from the front and side. Spot beams at this height also add a dramatic forward throw that combo bars cannot replicate.
This setup pairs naturally with a bumper-mounted combo bar. The two setups cover different distances and heights, creating a complete front lighting picture with no overlap or wasted coverage.
7. Grille-insert LED lighting
Grille-mounted LED strips or pods fill the front face of the truck with light and tie the front fascia together visually. Custom grille inserts with integrated LED channels are popular on full-size trucks like the Ford F-250 and Ram 2500. This placement sits in the fog/dust zone and adds a low, wide light source that complements taller bumper and roof-mounted setups.
The grille zone is often overlooked in favor of more dramatic roof or underbody lighting. Filling it creates a complete front-to-ground lighting profile that stands out at shows.
8. Cab and sleeper marker light rows
Marker light rows along the cab roofline and sleeper sides are a signature look on big-rig-inspired show trucks. Running amber or multi-color LED marker lights in a straight, evenly spaced row signals attention to detail. Proper wiring practices, including dielectric grease and solid grounding, prevent dim lights and corrosion in these exposed positions.
Correct relay and fuse sizing for multi-zone systems protects the entire lighting setup from a single point failure. A blown fuse in a marker light row at a show is an avoidable embarrassment.
9. Remote-controlled multi-zone color system
A remote-controlled lighting system lets you switch colors, patterns, and zones from outside the truck during a show walk-around. Remote control lighting for trucks adds a live demonstration element that static lighting cannot provide. Bluetooth-integrated controllers allow smartphone control for more complex zone programming.
The key to a reliable remote system is clean wiring from the start. A well-planned wire harness with labeled zones makes troubleshooting fast and keeps the install looking professional under the hood.
10. Interior show lighting for cab display
Interior lighting completes the show truck package when the doors are open during display. LED strips along the door sills, under the dash, and across the headliner create a cohesive look that extends the exterior lighting theme inside. Interior show lighting is often the detail that wins close judging decisions at competitive shows.
Color-matching interior lights to the exterior peripheral zone creates a unified theme. A truck with amber exterior watermelon lights and matching amber interior accents reads as a deliberate, well-planned build.
How to choose quality lighting components
High-performance lensed optics determine whether your truck lighting lasts six years or fails within six months. The difference comes down to potted internals, hard polycarbonate or tempered-glass housings, and precision lens alignment. Open-face SMD strips look fine in a product photo but degrade quickly under heat, vibration, and moisture.
| Feature | Standard open-face SMD | High-performance lensed optic |
|---|---|---|
| Light appearance | Dotted, uneven | Continuous, neon-like |
| Moisture resistance | Low | High (potted internals) |
| Housing material | Plastic | Polycarbonate or tempered glass |
| Typical lifespan | 6–18 months | 5–7 years |
| Color fidelity over time | Yellows and fades | Stable |
Dual-color watermelon lights with tempered-glass lenses are a clear example of this quality gap. Mass-market versions with plastic lenses lose color separation within one show season. The investment in quality components pays back in fewer replacements and a consistently sharp appearance at every show.
Pro Tip: Check for potted internals before buying any LED pod or strip. Potted means the circuit board is sealed in resin, which blocks moisture and vibration damage.
How to plan pod placement and wiring for a cohesive setup
Pod placement planning starts with your zone map. Assign a pod count to each zone before ordering anything. 6 to 8 rock light pods are standard for lifted trucks to eliminate dark zones beneath the frame. Two pods per wheel well, angled downward and forward, cover the ground zone without creating hot spots.
Wiring discipline separates a professional install from a fire hazard. Follow these practices on every build:
- Run each zone on a dedicated fused circuit.
- Use dielectric grease on every connector exposed to weather.
- Leave 6–8 inches of wire slack at each pod for suspension travel.
- Label every wire at both ends before routing.
- Ground each zone to a clean, paint-free chassis point.
Bluetooth and remote integration works best when planned into the wiring from the start. Retrofitting a remote controller into an existing harness creates connection points that fail over time. Build the control system into the original wiring plan and the result is cleaner and more reliable.
Key Takeaways
The best show truck lighting setups combine five-zone planning with high-performance lensed optics, proper wiring, and deliberate pod placement to create a display that is both visually striking and durable.
| Point | Details |
|---|---|
| Zone planning is non-negotiable | Map all five lighting zones before purchasing any components to avoid gaps and overlap. |
| Lensed optics outlast SMD strips | Potted, lensed LED components last years longer and maintain color fidelity at shows. |
| Rock lights need 6–8 pods | Two pods per wheel well, angled forward, eliminate underbody dark zones on lifted trucks. |
| Wiring quality determines reliability | Dielectric grease, dedicated fused circuits, and clean grounds prevent failures at shows. |
| Interior lighting closes the package | Color-matched interior accents extend the exterior theme and win close judging decisions. |
What I have learned building show truck lighting setups
The most common mistake I see is buying lights before planning zones. Enthusiasts spend money on a dramatic roof bar and a set of rock lights, then realize the peripheral zone is empty and the grille is dark. The truck looks unfinished at the show, and they end up buying twice.
The second mistake is choosing components based on price alone. I have seen beautiful builds ruined by cheap watermelon lights that yellowed after one outdoor show season. The cost difference between a quality tempered-glass lens and a plastic one is real, but so is the difference in how the truck looks two years later.
My personal favorite combination is a 12-light air cleaner bracket with amber GLO-style watermelon lights up front, 8 rock light pods underneath, and color-matched wheel well strips. That combination covers three zones cleanly and creates a layered effect that reads well from every angle. Add a remote control system and you have a truck that performs during a walk-around, not just while parked.
The advice I give every enthusiast is this: spend 30 minutes with a photo of your truck and a zone map before you spend a dollar. The plan costs nothing. The mistakes cost a lot.
— Christopher
Wheellightexpress lighting products for your show truck build
Building a show truck lighting setup requires components designed for the job, not generic parts adapted to fit. Wheellightexpress designs all products in Louisiana specifically for automotive enthusiasts who want original, quality-built lighting solutions.

The wheel light rings and strips from Wheellightexpress are built for accent and peripheral zone coverage with the continuous, clean appearance that show judges notice. For wiring, the wire harness leads are engineered to handle multi-zone setups safely and cleanly. Wheellightexpress also offers financing options, so you can build the full setup your truck deserves without waiting. Visit Wheellightexpress to see the full product catalog and find components that match your build.
FAQ
What are the five primary lighting zones for show trucks?
The five zones are fog/dust, peripheral, primary driving, distance, and ground. Each zone requires specific light types and placement to create a complete, layered lighting display.
How many rock lights does a lifted truck need?
6 to 8 rock light pods are standard for a lifted four-wheel truck. Two pods per wheel well, angled downward and forward, eliminate dark zones beneath the frame.
What is the difference between lensed optics and open SMD strips?
Lensed optics produce a continuous, neon-like glow and last significantly longer than open SMD strips, which appear dotted and degrade faster under heat and moisture.
How do I control multiple lighting zones on a show truck?
A remote-controlled or Bluetooth-integrated wire harness lets you switch zones, colors, and patterns from outside the truck. Planning the control system into the original wiring produces the most reliable result.
Why do watermelon lights fail early on some trucks?
Mass-market watermelon lights use plastic lenses that yellow and lose color separation quickly. Lights with tempered-glass lenses and machine-built tolerances maintain color fidelity and reliability across multiple show seasons.