

LED strips get hot, and past a certain wattage per meter that heat determines how long they last. The single most important fix is mechanical, not electrical. Mount the strip to a properly sized aluminum channel with good thermal contact, and pair it with a driver rated with 20 to 30 percent headroom. Everything else in effective heat management builds on that one decision.
TL;DR:
- Mount LED strips in appropriately sized aluminum channels with good thermal contact, especially for high-wattage or enclosed installations.
- Use thermal-rated adhesive tape on strips above 7 W/m to improve heat conduction into the aluminum channel.
- Keep drivers outside sealed channels and give them 20 to 30 percent headroom to prevent premature failure from overheating.
- For high-power, dense, or vehicle-mounted strips, add active cooling or larger heat sinks to manage heat effectively.
- Regularly check for signs of overheating, such as dimming, color shift, or hot-to-touch strips, and adjust the setup accordingly.
Table of Contents
- What Causes LED Strip Heat Management Problems
- How Hot Do LED Strips Actually Get?
- Where Heat Becomes a Real Problem
- The Cooling Methods That Actually Work
- Sizing Rules of Thumb for Channels and Heat Sinks
- Spotting Overheating Before It Becomes a Failure
- Vehicle Installs: What Wheellightexpress Sees in the Field
- Quick Install Checklist Before You Power On
- Why the Simple Fixes Get Overlooked
- Get Strips Built for the Heat You’re Actually Managing
- Sources
What Causes LED Strip Heat Management Problems
LED chips are not perfectly efficient. Some of the electrical energy driving them converts to light, and the rest becomes heat that has to go somewhere. That basic conversion loss is the starting point for almost every LED strip heat management issue installers run into.
A few factors decide how much heat a given run produces:
- Wattage per meter and drive current. A 24 W/m strip generates roughly four times the heat load of a 6 W/m strip in the same length.
- Driver inefficiency and voltage drop. Cheap or undersized drivers waste more power as heat, and that loss compounds on longer runs where voltage drop already forces the strip to work harder near the far end.
- LED density. High-density strips (120 LEDs per meter and up) or COB strips pack more emitters into less surface area, which concentrates heat in a smaller footprint than a sparser, low-density strip carrying the same total wattage.
Run length matters too. A 5-meter run pulling power from one end sees more resistive loss, and therefore more heat, at the far end than a 2-meter run with the same density.
How Hot Do LED Strips Actually Get?
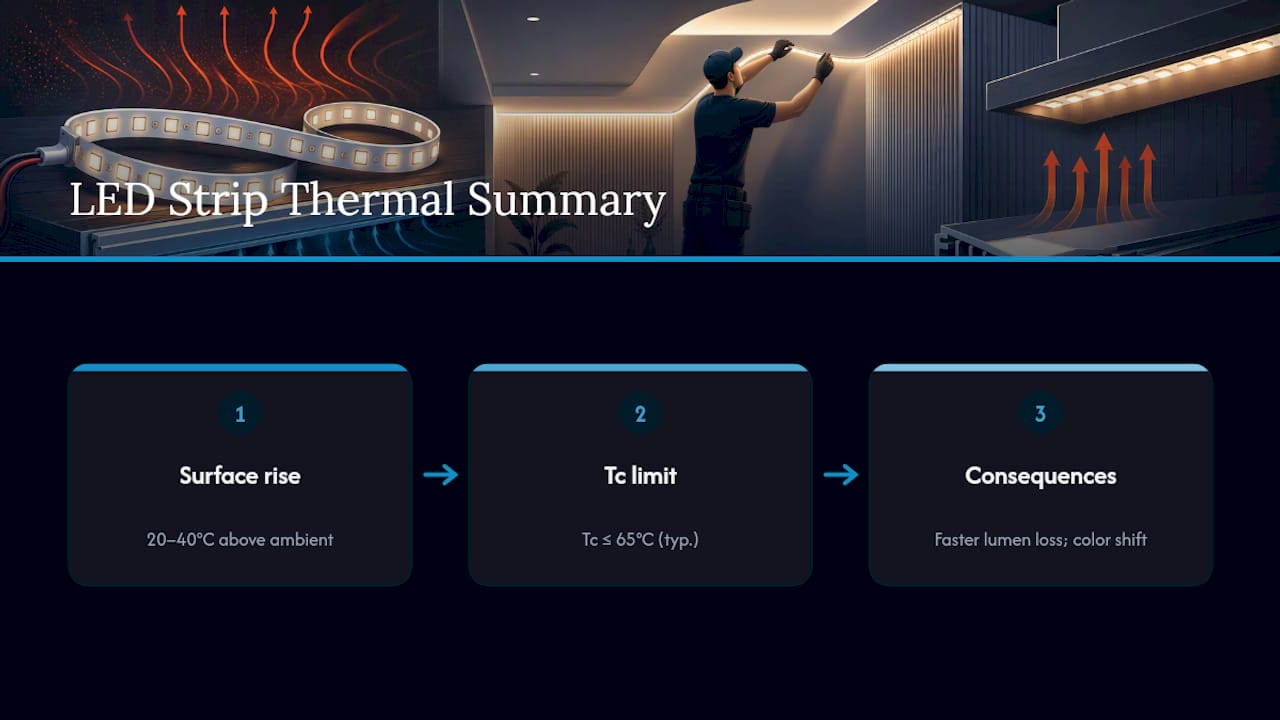
Surface temperatures on high-power LED strips commonly run 20 to 40°C above ambient without a heat sink, and that range is exactly why manufacturers care less about surface temperature and more about the Tc test point. Tc is the case temperature measured at a specific spot the datasheet defines, and it correlates directly with junction temperature and rated lifetime.
The number that matters: Signify’s thermal design-in guidance for its Fortimo LED strips specifies that Tc must stay under the datasheet maximum to hit rated life. Some LED tape datasheets set that ceiling around 65°C at the Tc point. Exceed it consistently, and you’re not just risking a slightly dimmer strip. You’re accelerating lumen depreciation toward L70 (the point where output drops to 70 percent of initial brightness) and inviting visible color shift as the phosphor and chip degrade unevenly across the run.
Where Heat Becomes a Real Problem
Open-air installs on a flat aluminum surface rarely struggle. The trouble starts when convection gets cut off.
- Enclosed or recessed channels trap warm air around the strip instead of letting it rise away, which raises steady-state temperature even when the channel itself is aluminum.
- Waterproof, silicone-potted strips run hotter than open strips of the same wattage because that protective silicone coating is also a thermal insulator. If you’re running a sealed IP65 strip, size the channel wider than you would for an exposed IP20 strip to compensate.
- Vehicle installs stack the problem: tight cavities, nearby engine or exhaust heat, and limited airflow all push ambient temperature up before the strip even switches on.
None of these situations are automatic failures. They just mean the margin for error on channel choice and adhesive gets smaller.
The Cooling Methods That Actually Work
Once you know where heat is building up, the fix follows a predictable order: get the heat off the chip, move it through metal, then let it escape into the air.
- Choose an aluminum channel sized for the job. Channels work through a three-stage process: conduction carries heat from the LED board into the metal, convection carries it from the metal into surrounding air, and radiation sheds a smaller portion directly. Aluminum channels are consistently the single biggest improvement you can make to a strip’s thermal performance, and picking a profile a few millimeters wider than the strip itself leaves room for thermal tape without pinching the board.
- Upgrade the adhesive on higher-wattage runs. Stock 3M-style adhesive backing is built for grip, not heat transfer. On strips pulling more than roughly 7 W/m, swapping to thermal-rated tape can lower steady-state temperature by 5 to 10°C simply by improving the conduction path into the channel.
- Size the driver with headroom, and keep it outside sealed channels. A driver running at its rated maximum continuously runs hotter and fails sooner. Give it 20 to 30 percent headroom over the strip’s actual draw, and mount it somewhere ventilated rather than tucked inside the same enclosed channel as the strip.
- Add active cooling for very high-power installs. COB strips or dense runs pushing well past 15 W/m sometimes need a finned heat sink or even small forced-air cooling, particularly in enclosed vehicle cavities where passive convection barely exists.
Pro Tip: Minimize the air gap between the strip and the channel floor. Even a thin layer of trapped air acts as an insulator, which defeats the purpose of an expensive aluminum profile. A thermal tape or thin thermal paste layer closes that gap far better than adhesive alone.
Sizing Rules of Thumb for Channels and Heat Sinks
You don’t need a thermal camera to make a smart call on channel and adhesive before you buy. A few thresholds cover most situations:
- Under 5 W/m: A channel is optional for open-air, well-ventilated installs, though it still improves longevity.
- 5 to 10 W/m: Use a channel any time the install is enclosed, recessed, or has limited airflow.
- Above 10 W/m: Use a channel, period, regardless of installation type.
- Heat sink surface area: A conservative starting heuristic borrowed from discrete-LED guidance suggests roughly 3 square inches of heat sink surface per watt, with aluminum as the practical extrusion material over copper for cost and weight.
- Contact quality matters as much as size. A slightly undersized channel with excellent contact often outperforms an oversized one with an air gap or dried-out adhesive.
Spotting Overheating Before It Becomes a Failure
A strip running warm to the touch inside its channel is normal. A strip that’s hot enough to be uncomfortable after a few minutes, or one showing physical symptoms, is telling you something different.
- Dimming or uneven brightness across sections of the run, especially worse at one end.
- Visible color shift, where white LEDs drift warmer or cooler than the rest of the strip.
- Dead sections where a cluster of LEDs stops working while the rest still runs.
- Bubbling adhesive or desoldered pads, a clear sign the chip has been running past its Tc limit for a while.
If you catch any of these, the immediate fixes are straightforward: reduce drive current through dimming, improve ventilation around the channel, relocate the driver away from the strip’s heat zone, or step down to a lower-wattage strip if the fixture simply can’t dissipate what the current one produces.
Vehicle Installs: What Wheellightexpress Sees in the Field
Vehicle lighting adds constraints you won’t find in a living room install, and the strip choice you make up front affects thermal performance for years. For most exterior applications like wheel wells, rock lights, and underbody runs, a fully sealed IP65 strip is worth the slightly higher operating temperature because it protects against road spray and debris. Interior cab lighting can often get away with IP20 strips, which run cooler thanks to better direct airflow.
Wire routing matters just as much as the strip itself. Keep driver placement away from exhaust runs and engine bay heat, and route harnesses so they aren’t pressed flush against hot metal surfaces for long stretches. Our guide on dust-proof LED strips for vehicles covers IP-rating trade-offs in more depth, and the breakdown of high-density LED strips for vehicles explains why density-heavy strips need extra thermal planning in tight wheel-well cavities.
Quick Install Checklist Before You Power On
Run through this sequence before the strip ever sees full power, not after something starts failing:
- Read the strip’s spec sheet for W/m and confirm it against the datasheet’s Tc limit.
- Select channel width and alloy based on wattage, adding margin if the install is enclosed or sealed.
- Swap stock adhesive for thermal-rated tape on anything above roughly 7 W/m.
- Size the driver with 20 to 30 percent headroom and mount it somewhere ventilated.
- Power on at full brightness for 30 to 60 minutes, then check surface temperature against datasheet Tc guidance.
- Record the strip model, channel, and driver used for future maintenance reference.
Why the Simple Fixes Get Overlooked
Most advice on LED strip heat management jumps straight to exotic solutions: forced-air fans, oversized copper sinks, exotic thermal compounds. That’s backwards for the vast majority of installs. The data points to something less exciting: a correctly sized aluminum channel with real thermal contact solves most heat problems before they start, and a driver with honest headroom solves most of the rest.
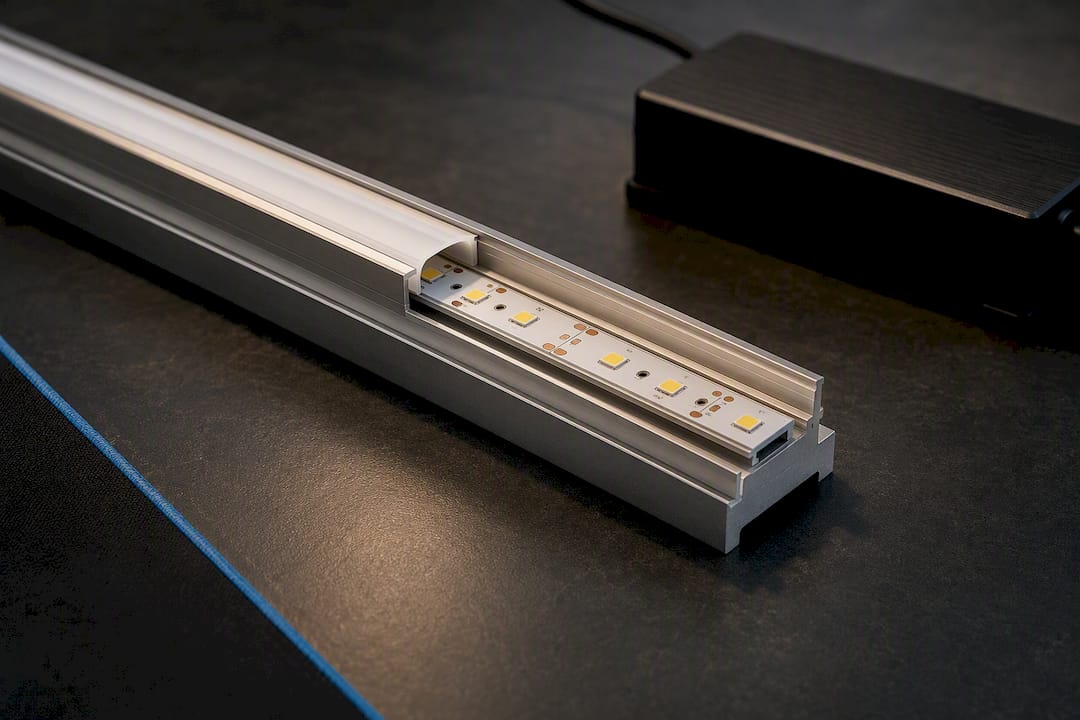
The gap I keep seeing is installers treating the channel as cosmetic trim rather than the primary cooling component it actually is. A strip mounted loosely in an undersized channel with stock adhesive is barely better off than one taped to bare plastic. Fix the contact quality first, then worry about wattage thresholds and heat sink math.
If you take one thing from this guide, prioritize measurement over guesswork: run the strip at full brightness for an hour, check the surface temperature near the Tc point, and compare it against the datasheet. That fifteen-minute check tells you more than any general rule of thumb ever will.
— Christopher
Get Strips Built for the Heat You’re Actually Managing
Some companies design LED strips and wheel light kits with thermal performance built into the layout rather than adding it afterward, which matters more in a wheel well than almost anywhere else on the vehicle. That means you’re not retrofitting a generic overseas strip with aftermarket channels and hoping the adhesive holds.

If you’re upgrading from a strip that’s already shown dimming or color shift, our wheel light ring and strip kits are built for exactly this kind of high-heat, high-vibration environment, and a replacement wire harness keeps driver placement clean and away from exhaust heat. Some kits include satisfaction guarantees, and financing options may be available to help with upgrading your setup. Browse the full automotive lighting lineup and find the kit that matches your install.
Sources
- Do LED strip lights need a heat sink? - LEDLightingInfo
- LED Heatsinks and Thermal Management - LEDSupply