
Spinning wheel lights, known in the industry as LED wheel ring systems, transform the visual presence of any truck or custom build and are fully achievable as a DIY project with basic electrical knowledge. A standard spinning wheel light installation takes 4 to 6 hours and costs between $150 and $400 depending on LED density and controller features. This install spinning wheel lights guide covers every phase: tools, mounting, wiring, and testing. Whether you are building a show truck or adding personality to a daily driver, the process is the same, and the results are worth every hour.
What does an install spinning wheel lights guide actually cover?
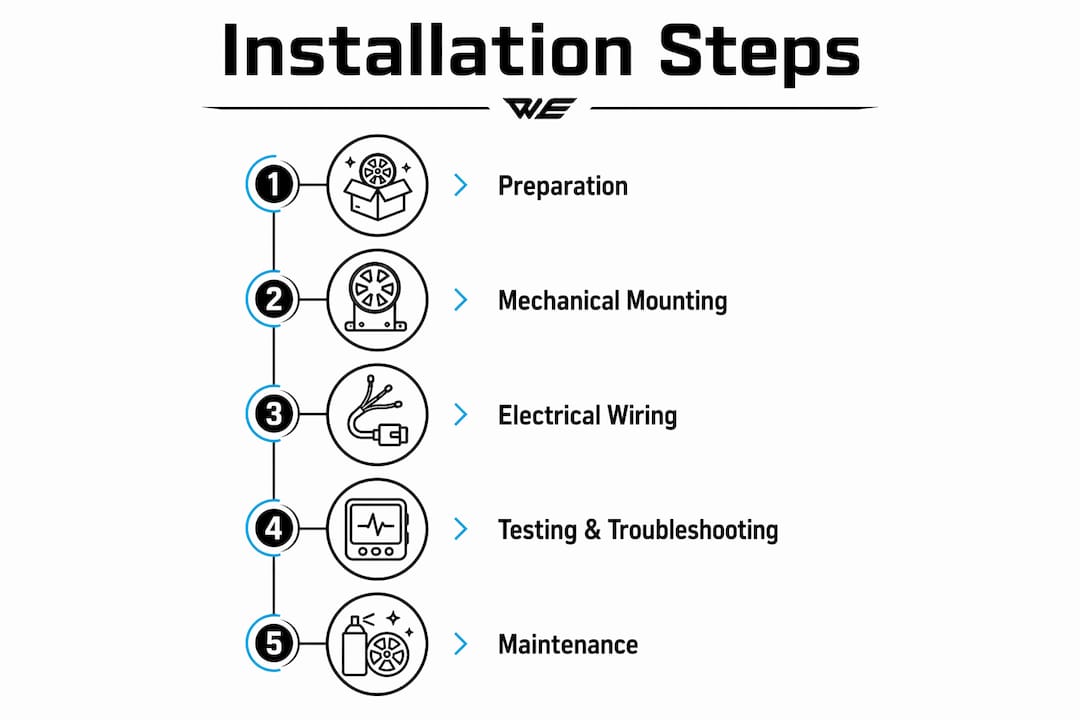
A complete LED wheel ring installation involves four distinct phases: preparation, mechanical mounting, electrical wiring, and system testing. Skipping any phase is the most common reason DIY installs fail within the first few weeks. Before you touch a wire, you need the right parts in hand and your vehicle properly staged.
Tools and kit components you need
Gather these tools before starting:
- Jack stands and a floor jack
- Wire cutters and wire strippers
- Electric drill with metal bits
- Zip ties (at least 30)
- Electrical tape and heat shrink tubing
- Mounting hardware and self-tapping screws
- Multimeter for voltage testing
A standard LED wheel ring kit from Wheellightexpress includes LED ring strips, a controller module, a power wire harness, and either a remote or Bluetooth app control. The wheel light ring and strip kits are designed with pre-wired connectors that reduce splicing time significantly. You will also want self-tappers and inline fuses on hand before you start, since these are the two most commonly forgotten components.
Comparing wheel light kit options
| Kit Type | Brightness | Control Method | Approximate Cost |
|---|---|---|---|
| Basic LED ring kit | Moderate | IR remote | $150 to $200 |
| RGB addressable ring | High | Bluetooth app | $250 to $350 |
| Full spinning display | Very high | App plus slip ring | $300 to $400 |
| Strip-only kit | Low to moderate | Manual switch | $80 to $150 |
The RGB addressable ring with Bluetooth control is the most popular choice among custom builders in 2026 because it offers the widest range of color patterns without requiring hard-wired switches inside the cab.
Vehicle preparation steps
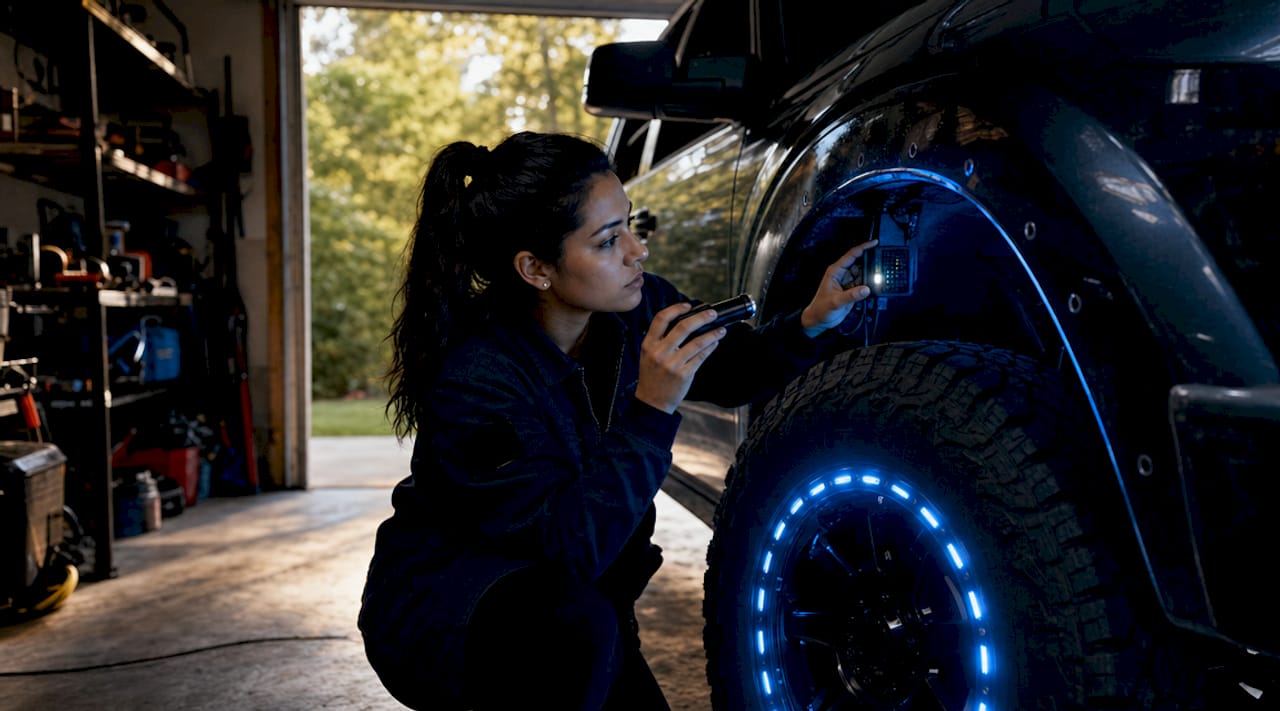
Park on level ground and chock the rear tires before lifting. Disconnect the negative battery terminal first. This step protects both you and the vehicle’s electronics during wiring. Remove all four wheels to give yourself clean access to the wheel wells and rim faces where the LED rings will mount.
How to install wheel lights: step-by-step process
Follow these steps in order. Deviating from the sequence, particularly wiring before mounting, creates rework and increases the chance of pinched wires.
- Mount the ring brackets to the inner rim face using the provided hardware. Wheellightexpress ring brackets are pre-drilled for standard bolt patterns on most truck and passenger car rims.
- Attach the LED strip or ring to the bracket, pressing firmly along the adhesive backing. Use two zip ties per ring as mechanical backup.
- Route the power lead from the wheel hub area toward the engine bay or fuse box, keeping wires away from brake rotors, exhaust components, and steering linkage.
- Create a service loop at the wheel end of each wire run. Leave 4 to 6 inches of slack coiled and secured near the hub to accommodate suspension travel.
- Connect the positive lead to a switched 12V source or fuse box slot. Connect the negative lead to a clean chassis ground point, not a painted surface.
- Wire the controller module per the kit instructions, connecting signal wires for color mode triggers if your kit supports brake light activation.
- Reconnect the battery and power on the system without reinstalling the wheels yet.
- Perform a full dry run test. Cycle through all color modes and patterns. Turn the steering wheel to full lock in both directions and watch for wire tension or snag points.
- Reinstall the wheels only after confirming zero snag points and full controller function.
- Torque lug nuts to factory spec and take a slow test drive before any high-speed use.
Pro Tip: Film the dry run test with your phone. Slow-motion playback reveals wire movement you cannot see in real time, especially near the upper control arm and strut.
The dry run test phase separates successful installs from failures. Wires that look fine at rest can snag on steering components the moment you turn the wheel, and catching that before final mounting saves hours of rework.
What are the best wiring practices for wheel light setup?
Wiring is where most DIY installs go wrong. The mechanical mounting is straightforward, but electrical mistakes cause flickering, shorts, and in rare cases, fire risk.
Tapping into DRL or parking light circuits automates wheel light activation so the lights come on whenever the vehicle lights are on. This eliminates the need for a manual switch and gives the install a factory-integrated feel. It is the preferred method for truck owners who want clean, professional results.
Inline fuses near the battery on the positive wire are non-negotiable. A short circuit without a fuse can ignite wiring insulation within seconds. Use a fuse rated 5 to 10 amps above the total draw of your LED system, and place it within 18 inches of the battery terminal.
Service loops and wire slack near the wheel are equally critical. Independent suspension moves the wheel through several inches of travel on every road irregularity. A tight wire will snap or unplug within a few hundred miles.
Wiring do’s and don’ts
Do:
- Use heat shrink tubing over every splice, not just electrical tape
- Secure wires every 6 to 8 inches with zip ties along the chassis
- Route wires through existing grommets in the firewall when possible
- Label each wire run before final routing to simplify future troubleshooting
- Consult a wiring guide for your skill level before starting
Don’t:
- Run wires across hot exhaust components without heat-resistant sheathing
- Ground to painted metal, which creates resistance and causes flickering
- Skip the inline fuse to save time
- Use undersized wire gauge for the total LED draw
Pro Tip: Protect wiring runs along the frame with split loom conduit. It costs under $10 for a 10-foot section and prevents abrasion damage from road debris over time.
Bluetooth or app-controlled controllers add real convenience for changing colors and patterns, but they depend entirely on clean power and ground connections. A marginal ground point that works fine for a basic circuit will cause Bluetooth dropouts and erratic color behavior in an app-controlled system.
For RV owners and those with larger vehicles, proper wheel and wiring protection during driving conditions applies the same principles: secure routing, protected splices, and regular inspection intervals.
How do you test and troubleshoot spinning wheel lights?
Testing is not optional. It is the phase that confirms your install is road-ready rather than just visually complete.
Power on the system and cycle through every available color and pattern using the remote or app. Confirm all four wheels respond simultaneously and that no wheel lags or flickers. Then drive the vehicle at low speed in a parking lot and observe the lights from outside the vehicle. Flickering at speed almost always points to one of two causes: a poor ground connection or a low-quality slip ring.
High-quality slip rings are the single most important component in a spinning LED wheel light system. Cheap slip rings cause flickering and signal drops that no amount of wiring correction will fix. If you are experiencing persistent flicker after confirming clean grounds, replace the slip ring before troubleshooting anything else.
Proper balancing and secure mechanical mounting prevent vibration blur on spinning displays. An unbalanced LED arm or loose bracket causes the image to shake at speed. Slow-motion video from a phone camera is the fastest diagnostic tool for this issue.
Common issues and fixes:
- Flickering at all speeds: Check ground connections first, then inspect the slip ring
- One wheel not responding: Trace the signal wire from controller to that wheel’s connector
- Colors cycling incorrectly: Recalibrate the controller per the kit instructions
- Lights cutting out at full steering lock: Add more slack to the service loop at that wheel
- Vibration blur on display: Re-torque all mounting hardware and rebalance the wheel
Maintenance is straightforward. Inspect all wiring connections every 6 months or after any suspension work. Check zip tie integrity along frame runs and replace any that show cracking. LED strips themselves are long-lived, but connectors exposed to road spray benefit from a light coat of dielectric grease annually.
Key takeaways
Successful spinning wheel light installation requires clean mechanical mounting, proper wiring with inline fuses and service loops, and a thorough dry run test before the wheels go back on.
| Point | Details |
|---|---|
| Budget and time realistically | Plan for 4 to 6 hours and $150 to $400 depending on kit features and LED density. |
| Service loops prevent failures | Leave 4 to 6 inches of wire slack at each wheel to handle suspension travel without snapping. |
| Inline fuses are mandatory | Place a fuse within 18 inches of the battery positive terminal to protect against shorts. |
| Dry run test before final mount | Test at full steering lock before reinstalling wheels to catch wire snag points early. |
| Slip ring quality determines display quality | Invest in a quality slip ring upfront. Cheap ones cause flickering that wiring fixes cannot resolve. |
What I have learned after watching dozens of wheel light installs go right and wrong
I have seen builders spend $350 on a premium RGB kit and then ruin the install with a $3 slip ring. The slip ring is the rotating electrical connector that transfers power and signal from the stationary vehicle wiring to the spinning LED display. It is the most mechanically stressed component in the entire system, and it is almost always the cheapest part in a budget kit. Signal timing and cable length near addressable LEDs significantly affect display clarity. A short lead paired with a quality slip ring produces a sharp, stable image. A long lead with a cheap slip ring produces a blurry, flickering mess.
The second mistake I see constantly is skipping the service loop. Builders route the wire tight and clean because it looks professional. Then the wire snaps at the first pothole because the suspension compressed and pulled the wire taut. Four inches of coiled slack secured with a zip tie is invisible once the wheel is on and it prevents a failure that would otherwise require pulling the wheel again.
My honest recommendation on Bluetooth versus hard-wired controls: go Bluetooth if your power and ground wiring is clean. The convenience of changing patterns from your phone is real. But if you are working with marginal connections or an older vehicle with questionable grounds, hard-wire a switch instead. A reliable hard-wired install beats an unreliable wireless one every time.
Patience during the dry run phase pays off more than any other single step. Turn the wheel to full lock, bounce the suspension by hand, and watch every wire run. Fix what moves. Then drive it.
— Christopher
Ready to build your wheel light setup?
Wheellightexpress designs every LED wheel ring, wire harness, and mounting bracket in Louisiana, which means you get parts built specifically for the demands of American roads and custom builds.

Browse the full automotive lighting catalog to find LED wheel ring kits, replacement strips, controllers, and complete wire harness leads. Every kit ships with the hardware you need to start the install the same day it arrives. Wheellightexpress also offers financing options so you can get the full setup without waiting. If you have questions about which kit fits your specific vehicle, the team is ready to help you choose correctly the first time.
FAQ
How long does a spinning wheel light installation take?
A standard DIY spinning wheel light installation takes 4 to 6 hours for someone with basic electrical knowledge and the right tools on hand.
What causes spinning wheel lights to flicker?
Flickering is most commonly caused by a low-quality slip ring or a poor ground connection. Replace the slip ring first if grounds check out clean.
Do I need to remove the wheels to install LED wheel lights?
Yes. Removing the wheels gives you proper access to the rim face and wheel well for mounting brackets and routing wires safely away from brake and suspension components.
Can I connect wheel lights to my vehicle’s existing wiring?
Yes. Tapping into the DRL or parking light circuit automates the wheel lights to power on with the vehicle’s lights, eliminating the need for a separate manual switch.
How do I prevent wiring damage from suspension movement?
Leave a service loop of 4 to 6 inches of slack at each wheel, secured with a zip tie. This slack accommodates suspension travel and prevents wires from snapping under tension.