

The best approach for mounting a light bar on a lifted truck roof is a vehicle- or rack-specific heavy-duty bracket kit paired with a matched, fused relay harness. This combination gives you the strongest hold against highway vibration, the cleanest wiring path, and the least chance of a fitment surprise once the bar is on your roof. Universal brackets and spliced wiring cause most of the failures we see reported. Before you order anything, take these two measurements:
- Cab width at the mounting points, roof to roof rail
- Crossbar or rack spacing if you’re mounting to an existing rack
Get those two numbers right, and everything else in this guide falls into place.
Key Takeaways
A vehicle- or rack-specific heavy-duty bracket matched to a properly fused relay harness is what actually keeps a roof-mounted light bar secure, legal, and wired safely on a lifted truck.
| Point | Details |
|---|---|
| Measure before you buy | Check cab width and crossbar spacing to avoid a bracket that doesn’t fit your roof. |
| Match bracket to mounting method | Drill-through, gutter, and rack-specific brackets each need different sealing and hardware checks. |
| Size the bar to your cab | 37 to 48 inch bars cover most trucks; verify housing length against bracket span for 50 inch bars. |
| Always use a fused relay harness | Size the fuse and wire gauge above your bar’s actual amperage draw, not at it. |
| Check state law before road use | Off-road bars are generally for trail use; wire an in-cab disable switch for road driving. |
| Wheellightexpress supports the wiring side | Its U.S.-designed harnesses and replacement leads back the fused-harness approach this guide recommends. |
Table of Contents
- How Do You Choose the Right Roof-Mount Kit for a Lifted Truck?
- Drill-Through, Gutter Mounts, or Rack-Specific Brackets: Which Should You Use?
- What Length and Beam Pattern Work Best on a Lifted Truck Roof?
- What Wiring and Power Setup Do Roof-Mounted Light Bars Need?
- How Do You Install and Aim a Roof-Mounted Light Bar Correctly?
- Are Roof-Mounted Light Bars Legal on Public Roads?
- Why Trust Wheellightexpress and Christopher’s Installation Guidance?
- What Actually Matters When You Mount a Bar This High
- Get the Wiring Right the First Time With Wheellightexpress
- Frequently Asked Questions
- Sources
How Do You Choose the Right Roof-Mount Kit for a Lifted Truck?
A weak bracket or a mismatched harness is the most common reason a roof-mounted bar fails, not the LED itself. Work through these criteria in order before you check out.
- Measure first. Get cab width and crossbar spacing before you shop. A bar that’s an inch too wide for your mounting points means drilling new holes or returning the kit.
- Choose vehicle- or rack-specific over universal when you can. Kits built for your exact truck or rack profile include brackets, wiring notes, and hardware sized to fit without guesswork, and often skip drilling entirely.
- If you go universal, verify housing length against bracket span. Many 50-inch bars aren’t truly universal. End-cap designs vary enough that you may need spacers or a custom bracket, so confirm the mounting-hole spacing before you assume a fit.
- Check the materials. Heavy-gauge steel or aircraft-grade aluminum brackets with stainless hardware hold up far better on a lifted truck, where wind load at highway speed is higher than on a stock ride height.
- Look for a harness spec, not just a light. A kit that lists amperage and fuse rating up front tells you the maker actually thought about the wiring, not just the glow.
- Read the warranty and finish details. A powder-coated bracket with a real warranty behind it is worth more than a cheaper one with neither.
Drill-Through, Gutter Mounts, or Rack-Specific Brackets: Which Should You Use?
Three mounting methods dominate roof installs, and each comes with a real trade-off.
- Drill-through mounts give you the maximum strength and the most flexible placement, but you’re committing to sealed holes in sheet metal. Seam sealer and butyl gaskets aren’t optional here.
- Gutter mounts work if your truck still has factory drip rails, and they skip drilling entirely. They do need rubber gaskets to hold a watertight seal, and you should check the clamp points periodically for rust or paint damage, since trapped moisture under a tight clamp accelerates corrosion faster than an open seam ever would.
- Rack-specific brackets clip onto an existing roof rack or bed rack and usually need no drilling at all, provided the rack profile actually matches the bracket. Mismatch here is common enough that it’s worth double-checking bar width against your rack’s crossbar spacing before you tighten anything down.
Whichever method you pick, look for anti-vibration pads between bracket and roof and stainless fasteners throughout. A lifted truck flexes more over rough terrain than a stock one, and cheap zinc bolts back out faster than you’d expect.
Pro Tip: Snug every bolt by hand first, then torque in a cross pattern like you would lug nuts. Tightening one corner fully before the others can warp a bracket just enough to crack a seal months later.
What Length and Beam Pattern Work Best on a Lifted Truck Roof?
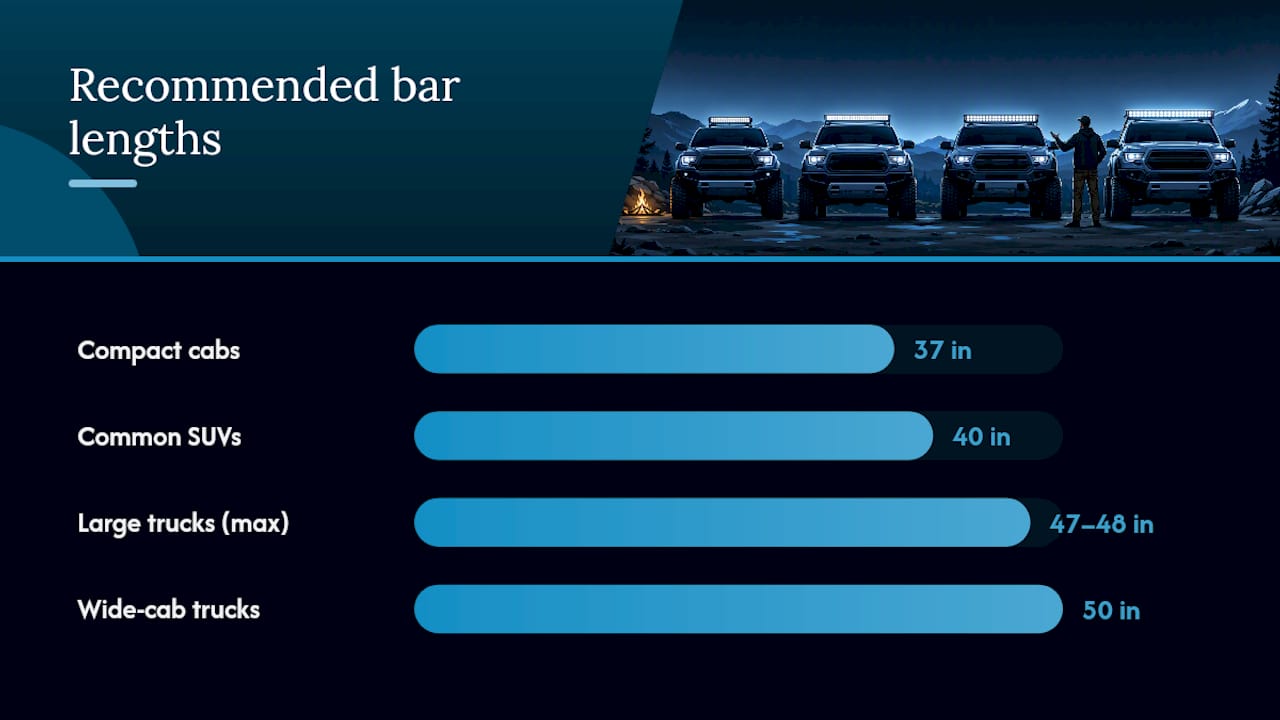
Bar length should match your cab width, not your budget. Buyers commonly land on 37 inches for compact rooflines, 40 inches for common SUVs, and 47 to 48 inches for maximum coverage on larger trucks, with 50-inch bars reserved for wide-cab trucks with the crossbar spacing to support them.
Beam pattern matters just as much as length:
- Spot beams throw a tight, far-reaching pattern, good for open desert or fast trail runs.
- Flood beams light up a wide area close to the truck, useful for camp setup or slow technical crawling.
- Combo (drive) patterns blend both and suit the typical lifted-truck user who needs some reach plus wide peripheral coverage on mixed trails.
Because your bar sits higher on a lifted truck than it would on a stock ride, a heavier concentration of spot elements can overshoot the road ahead and wash out on a hill crest. Before you buy, check the bar’s amperage or wattage rating. That number determines the harness and fuse size you’ll need in the next step.
What Wiring and Power Setup Do Roof-Mounted Light Bars Need?
Never wire a roof-mounted bar directly into a factory circuit. A single 50-inch light bar can pull more current than most stock switch circuits are rated to handle continuously, and that’s where wiring problems start.
- Run a fused relay harness sized to your bar’s amperage. The relay carries the heavy current straight from the battery; a low-current wire from your dash switch just tells the relay when to fire.
- Place the fuse close to the battery, not near the light bar, so a short anywhere downstream trips it before it can start a fire.
- Add a second battery or an isolator if you’re running multiple high-draw lights, especially for camp lighting or extended scene illumination where you don’t want to deep-cycle your starting battery.
- Estimate your draw from the spec sheet (watts divided by 12 gives you a rough amp figure) and size your fuse and wire gauge above that number, not at it.
Kits with pre-wired Upfitter harness compatibility cut install time considerably since they tap into factory switch provisions instead of running a new wire through the firewall. Reviewing golf cart relay wiring basics is a surprisingly good crash course, since the low-voltage relay logic is nearly identical to what runs your light bar.
Pro Tip: Label both ends of every wire you run before you tuck it behind the headliner. Six months from now, you’ll thank yourself when troubleshooting takes five minutes instead of an afternoon.
How Do You Install and Aim a Roof-Mounted Light Bar Correctly?
- Dry-fit everything first. Set the bracket and bar in place without drilling or committing to final positions, and check clearance against your cab, antenna, and any existing rack hardware.
- Mark, then drill. Once you’re confident in placement, mark hole locations and drill through, working slowly to avoid tearing the metal.
- Seal every penetration. Butyl seam sealer around each hole, plus a bead along the bracket base, keeps water out of the cab for years, not months.
- Aim on level ground. Park the truck level, then set vertical aim using a simple rule: at 25 feet, the beam’s hot spot should land at bumper height or slightly below.
- Dial back the angle for roof height. Because the bar sits higher than a bumper mount, reduce vertical aim slightly to avoid overshooting and blinding oncoming drivers at road transitions.
- Cycle through low, medium, and high beam. Confirm all functions before you call the job done.
- Re-torque after the first 100 to 200 miles. Vibration settles hardware, and a quick check of seals and wire strain relief catches problems before they become leaks or shorts.
Are Roof-Mounted Light Bars Legal on Public Roads?
Off-road light bars are built for trail use, not the highway, and using them on public roads is one of the fastest ways to draw a citation. Legal requirements vary considerably by state, so checking your local statutes before you wire anything into a dash switch is worth the ten minutes it takes.
Off-road light bars are generally intended for non-highway use, and running them on public roads can violate state auxiliary-lighting statutes depending on where you drive.
Emergency and warning light bars, the kind with 360-degree coverage, fall under a different legal classification than forward-projecting off-road bars, so don’t assume rules for one apply to the other. Practical steps that keep you compliant:
- Wire an in-cab disable switch so the bar is off by default on the road
- Use amber lens covers if you need any auxiliary lighting during road work
- Aim conservatively, especially on a roof mount where height already amplifies glare
Why Trust Wheellightexpress and Christopher’s Installation Guidance?
Wheellightexpress designs its lighting components in Louisiana, rather than sourcing generic overseas parts, and backs its wire harnesses, LED strips, and replacement leads with a satisfaction guarantee.
- Christopher’s how-to guidance draws on practical fitment and wiring standards covered throughout this guide
- Wheellightexpress offers direct customer support for harness and fitment questions after purchase
- Product design and assembly happen in the U.S., not through third-party overseas suppliers
What Actually Matters When You Mount a Bar This High
Most guides treat roof mounting as a bigger version of a bumper install. It isn’t. Height changes the physics of aiming, the wind load on your bracket, and the wiring run length, and too many installers skip straight to the LED spec sheet without accounting for any of that.
The biggest gap between conventional advice and reality is on wiring. Plenty of buyers assume a bar’s included switch is enough and splice into a factory circuit to save time. That’s how you cook a fuse box or dim your headlights every time the bar kicks on. A dedicated fused relay harness, sized to the bar’s actual draw, isn’t a nice extra. It’s the difference between a light bar that lasts the life of the truck and one that causes an electrical headache within a season.
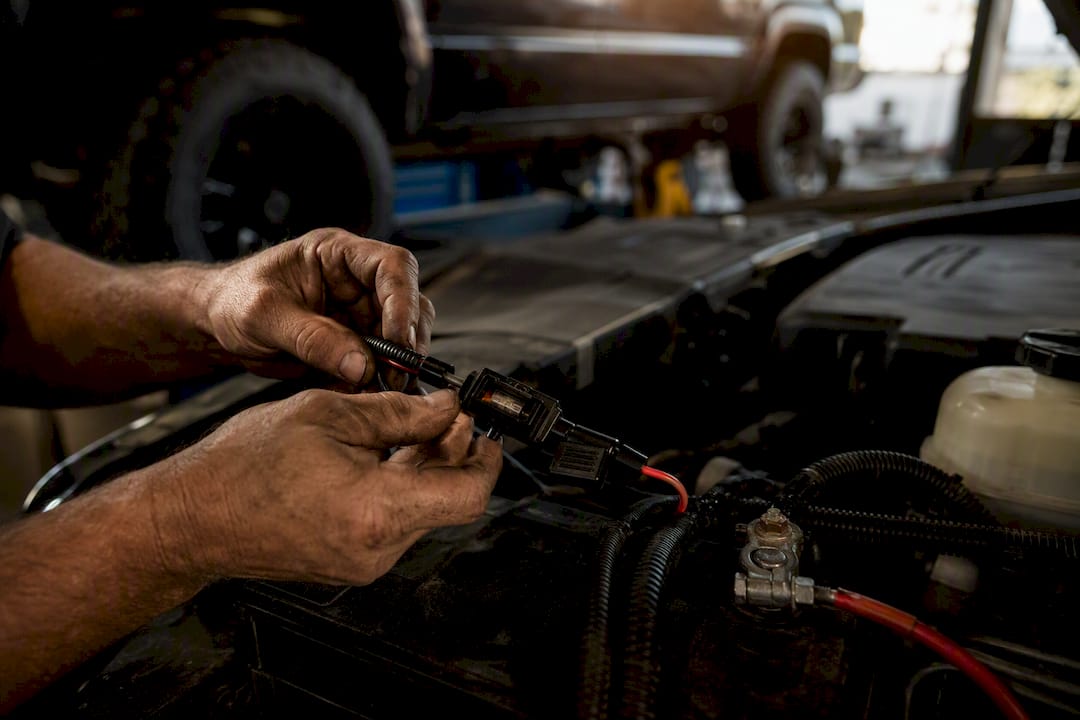
If you take one thing from this guide, prioritize the bracket and the harness before you fall in love with lumen counts. A stunning beam pattern mounted on a flexing bracket with an undersized fuse will fail you exactly when you need it most, out on a trail with no cell signal and no shop for fifty miles.
Get the Wiring Right the First Time With Wheellightexpress
A roof-mounted light bar is only as reliable as the harness feeding it, and that’s exactly where Wheellightexpress focuses. Every wire harness and replacement lead is designed in Louisiana, not sourced from an overseas catalog, so the amperage ratings and connector quality match what your build actually needs.

If you’re already shopping for a bracket kit and bar, pair it with a pre-made fused wire harness built for multi-light installs, or grab replacement harness leads if you’re upgrading an existing setup instead of starting from scratch. Every purchase comes with a satisfaction guarantee and direct customer support if you run into a fitment question mid-install, plus financing options if you’d rather spread the cost across your build instead of paying it all upfront. Head to the wire harness leads and wires page to match a harness to your bar’s amperage before you start drilling.
Frequently Asked Questions
Is it legal to run an off-road light bar on the highway? Generally no. Off-road light bars are built for non-highway use, and state auxiliary-lighting laws vary enough that you should check your own state’s statute before wiring one into a daily-driven truck.
What length light bar fits a lifted full-size truck? Most full-size trucks handle a 47 to 48 inch bar well, though cab width and crossbar spacing determine the exact fit, and wide-cab trucks can sometimes accommodate a 50-inch bar.
Do I need a relay harness if my light bar comes with a switch? Yes. The included switch usually only handles low-current signal wiring. A fused relay harness carries the actual load straight from the battery, protecting your factory wiring from overload.
Should I drill my roof or use a gutter mount? If your truck has factory drip rails, a gutter mount avoids drilling but needs regular inspection for rust. Drill-through mounts are stronger overall but require proper seam sealing to stay watertight.
Sources
- Light bar laws by state — 4WD Talk
- LED Light Bars for Off-Road & Trucks — Baja Designs
- Full size roof-mounted LED light bars — Extreme Tactical Dynamics