

Size your rock light fuse by dividing total watts by 12 volts, multiplying that amperage by 1.25, then rounding up to the nearest standard fuse. Place the fuse inline at the battery feed, before it reaches the relay, using a blade-style ATC/ATO or mini ATM fuse matched to your wire gauge. Get the placement wrong and you protect nothing.
TL;DR:
- Use the total wattage of your pods and accessories to calculate the fuse rating, adding a 25% safety margin and rounding up to the nearest standard size.
- For a 72-watt setup at 12 volts, a 10-amp fuse is appropriate with 14 AWG wire, provided the run is under 10 feet and the load remains stable.
- Place the inline fuse at the battery feed before the relay, using waterproof holders for off-road durability, to protect the longest, most vulnerable wire run.
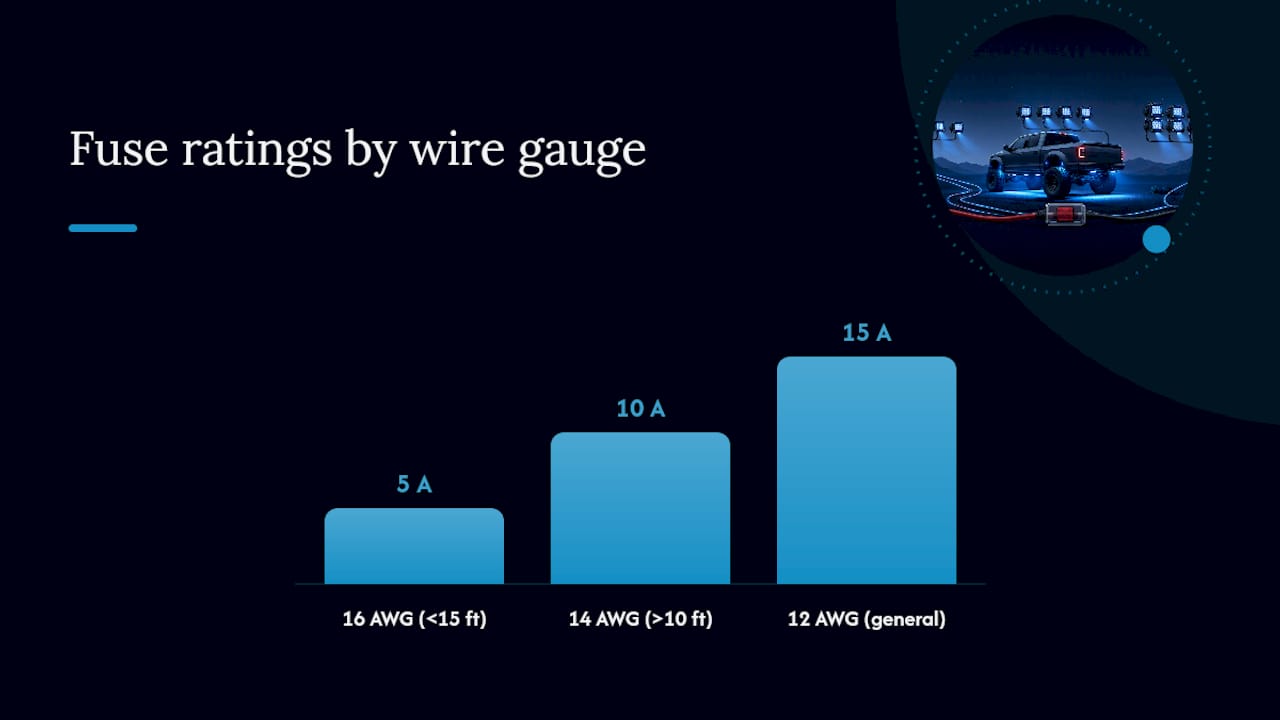
- Match the fuse capacity to the wire gauge: 16 AWG for 5 amps, 14 AWG for 10 amps, and 12 AWG for 15 amps, ensuring no fire risk from undersized wiring.
- Regularly verify actual current draw with a multimeter and avoid using larger fuses to fix blown ones, as persistent blows signal wiring faults that need fixing.
Table of Contents
- How to Calculate the Right Rock Lights Fuse Rating
- Choosing the Right Fuse Type and Placement
- Wire Gauge, Relays, and Voltage Drop
- Real Numbers: Fuse and Wire Choices by Pod Count
- Why Rock Light Fuses Blow (and How to Fix It)
- Where This Guidance Comes From
- A Final Word on Getting This Right
- Skip the Math With a Pre-Fused Harness
- Sources
How to Calculate the Right Rock Lights Fuse Rating
Every fuse calculation starts with wattage, not guesswork. Add up the wattage of every pod, plus any accessories sharing that circuit, such as a remote receiver or a secondary light bar tapped into the same feed.
We recommend the following process every time you wire a new set of pods:
- Total your wattage. Check your pod specs or datasheet, then add every pod on the circuit together.
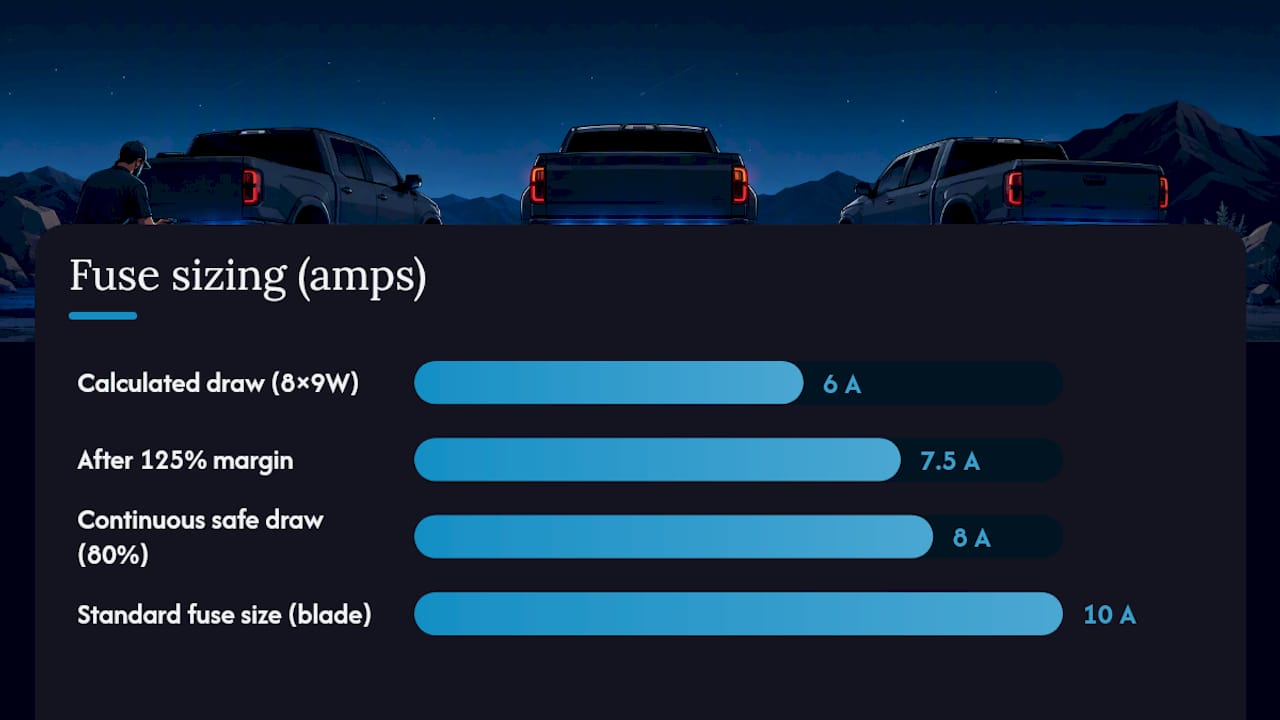
- Convert to amps. Use Amps = Watts / Volts. At 12 volts, eight 9-watt pods (72 watts total) draw 6 amps.
- Apply the 125% safety margin. Multiply that 6 amps by 1.25, giving you 7.5 amps of required fuse capacity.
- Round up to a standard size. Blade fuses come in 3, 5, 7.5, 10, 15, 20, and 25 amp increments, so 7.5 amps rounds to a 10-amp fuse in most cases.
This 125% approach isn’t arbitrary. It’s the standard formula used across DIY wiring guides because it absorbs the brief current spike LEDs draw at startup without blowing on you mid-trail, while still tripping fast enough to stop a real short.
If your pods pull close to their rated draw continuously, lean on the 80% rule too: a fuse should carry no more than 80% of its rating for sustained loads. A 10-amp fuse comfortably handles an 8-amp continuous draw, but running it right at 10 amps for hours invites nuisance blows. Measure actual voltage at your battery terminals if you’re near a threshold. A tired battery reading 11.8 volts instead of 12.6 pushes your amp draw higher than the math assumes.
Choosing the Right Fuse Type and Placement
Not every blade fuse fits every job, and where you mount it matters as much as its rating.
- ATC/ATO fuses work best for main circuits carrying 5 amps or more. They’re widely available and easy to source at any auto parts counter.
- ATM (mini) fuses suit lower-draw accessory circuits, like a single pair of pods or a switch-panel backlight, where space inside a fuse block is tight.
- Inline fuse holders belong close to the battery, on the positive feed before it ever reaches your relay. This protects the entire length of wire between the battery and the relay, which is the section most exposed to chafing against the frame.
- Waterproof inline holders are non-negotiable for off-road builds. Standard holders corrode fast once they’re exposed to mud, splashing, and vibration.
- A separate small fuse on the switch-side wire protects your dash wiring if you’re running a relay setup, since that wire only carries a fraction of an amp to trigger the relay coil.
Installing the fuse at the battery, not buried somewhere in the harness, follows the same logic wiring tutorials for rock lights consistently recommend: protect the longest, most vulnerable run first.
Pro Tip: Mount your inline fuse holder somewhere you can reach without crawling under the truck. A fuse buried behind the skid plate might as well not exist when it blows on the trail.
Wire Gauge, Relays, and Voltage Drop
Your fuse rating and wire gauge are a matched pair. Undersize the wire relative to the fuse and you’ve built a fire risk disguised as a safety device.
- 5-amp circuits typically run fine on 16 AWG wire for runs under 15 feet.
- 10-amp circuits call for 14 AWG, especially past 10 feet of total run length.
- 15-amp circuits need 12 AWG to avoid excess resistance and heat buildup.
A relay setup keeps your dash switch out of the high-current path entirely: battery to a fused feed, into the relay, out to the lights. The switch itself only handles a light control signal, protected by its own small fuse, which is exactly the architecture proper rock light wiring is built around. This same battery-fuse-relay-lights flow is worth sketching out before you cut a single wire; a relay wiring breakdown makes the signal-versus-load distinction easy to visualize even if you’ve never wired a relay before.
Voltage drop shows up as dim or flickering pods, usually on runs longer than 15 to 20 feet. Upsizing your wire gauge by one step, or splitting a large pod count into two shorter runs, fixes most cases. Use sealed, crimped connectors at every joint and run a solid ground back to a clean chassis point, not a rusty bolt.
Real Numbers: Fuse and Wire Choices by Pod Count
Copy these examples directly if your pods are close to 9 watts each, or recalculate using your own datasheet figures.
- 4 pods at 9 watts (36 watts total): 36 ÷ 12 = 3 amps. Multiply by 1.25 for 3.75 amps, round up to a 5-amp fuse on 16 AWG wire.
- 8 pods at 9 watts (72 watts total): 72 ÷ 12 = 6 amps. Multiply by 1.25 for 7.5 amps, round up to a 10-amp fuse on 14 AWG wire.
- 12 pods at 9 watts (108 watts total): 108 ÷ 12 = 9 amps. Multiply by 1.25 for 11.25 amps, round up to a 15-amp fuse on 12 AWG wire, or split into two groups of six pods, each on its own 10-amp fuse and 14 AWG feed.
Splitting larger kits into two fused groups instead of one large fuse is a common owner practice worth considering: if one group develops a fault, only half your pods go dark, and each run can use thinner wire. A single relay can still power both fused groups if you’re not running them on separate switches.
Why Rock Light Fuses Blow (and How to Fix It)
A fuse that blows once might be a fluke. One that blows repeatedly is telling you something specific.
- Nuisance blows happen right at startup and stop once you upgrade to the correctly rounded fuse size.
- Real shorts blow the fuse instantly, every time, the moment power is applied.
- Check for chafed insulation anywhere the harness crosses metal edges, frame rails, or suspension components.
- Confirm your ground connection is clean metal, not painted or rusted.
- Verify the relay wiring matches the correct terminals. A miswired relay coil circuit can mimic a short.
Work through it in order: visual inspection first, then a continuity check with the circuit dead, then a clamp-meter current reading with everything powered up. Standard multimeter and clamp-meter testing procedures will confirm whether your draw matches your calculation or something’s pulling more current than it should.
Pro Tip: If a fuse blows the instant you reconnect the battery, don’t just swap in a bigger fuse. That’s masking a short, not fixing one.
Where This Guidance Comes From
Christopher, who covers technical wiring guides for Wheellightexpress, built this piece around the calculation methods and installation practices used across established DIY wiring resources. Wheellightexpress designs and assembles its lighting harnesses and LED strips in the U.S., which means the fuse and wire pairings referenced above reflect real hardware, not theoretical specs.
- Related reading: fuse size for LED lights and wiring explained for every skill level
- Case studies and customer wiring examples: available on request through product support
A Final Word on Getting This Right
The 125% rule isn’t a suggestion I’d talk you out of, even for a simple four-pod setup. It’s cheap insurance against a $40 fuse holder saving you from a wiring fire under your truck. Where I see people cut corners is placement, not calculation. They do the math correctly, then bury the fuse three feet into the harness instead of at the battery, which defeats half the point.
Test your actual current draw with a multimeter after installation, not just on paper. Secure every inch of exposed wire against frame rails before your first trail run. Correct fusing is the difference between a minor blown fuse and a genuine fire risk.
— Christopher
Skip the Math With a Pre-Fused Harness
If you’d rather not run these calculations yourself, Wheellightexpress builds wire harnesses with the fuse size and wire gauge already matched to the load, so you connect and go instead of sourcing parts one at a time. Our wire harness leads are wired to the same battery-fuse-relay-lights layout covered above, and our replacement wire harness options let you swap a damaged run without re-engineering the whole circuit.

Pair either harness with our wheel light ring and strip kits, and every component from pod to fuse ships matched to spec. Browse the harness options and pick the one that fits your pod count before your next install.
Sources
The calculation method, safety factor, and placement guidance in this article draw from a few reliable references worth reading in full:
- Rock Light Fuse Size: The Complete Guide for a Safe DIY Install
- How to Wire Rock Lights Safely
- PMC technical safety/measurement overview