

Sequential side markers are worth the extra cost and wiring complexity if you want a modern, directional turn signal look and your vehicle already runs LED lighting with accessible wiring. Standard side markers remain the smarter pick if you want the simplest, lowest-risk upgrade with fewer parts to fail. Either way, check your wiring type and your state’s lighting rules before you buy anything, and know that Wheellightexpress designs U.S.-made harnesses and marker kits built for exactly this kind of retrofit.
TL;DR:
- Sequential side markers offer better visibility with a sweeping light motion, but require more complex wiring and higher costs than standard markers.
- Compatibility depends on whether your vehicle’s markers are 2-wire or single-wire grounded, with LED markers needing specific controllers to avoid flickering or dash errors.
- Federal regulations permit flashing markers only when combined with turn signals, and state rules on color and placement must also be followed to stay legal.
- Proper installation includes verifying wiring type, using purpose-built harnesses, and testing components on the bench before permanent mounting to prevent dash warnings and failures.
- Manufacturers like Wheellightexpress offer US-made, vehicle-specific kits with robust wiring and sealed connectors that improve reliability and reduce long-term failure risks.
Table of Contents
- Sequential vs Standard Side Markers: The Basic Setup
- How Do Sequential and Standard Markers Compare?
- Will Sequential Markers Work With My Vehicle’s Wiring?
- Is It Legal to Make Side Markers Flash?
- How Do You Choose Between Sequential and Standard Markers?
- What Should DIYers Watch for During Installation?
- How Do You Wire a Sequential Side Marker Kit?
- What Causes Side Marker Failures, and How Do You Fix Them?
- What Separates a Reliable Side Marker Kit From a Cheap One?
- Does a Side Marker Upgrade Affect Warranty or Insurance?
- A Practical Take on Sequential Retrofits
- Where to Get a Compatible Side Marker Kit
- Sources
- FAQ
Sequential vs Standard Side Markers: The Basic Setup
A standard side marker is a steady bulb or LED that stays lit whenever your parking lights are on. Depending on how a given vehicle is wired, some standard markers also flash in sync with the turn signal on that side. Most North American vehicles have run amber front and red rear side markers for decades, and manufacturers have not been required to make them flash, according to lighting consultant Daniel Stern’s technical writeup.
Sequential markers work differently. Instead of one light source, they use a strip of individually controlled LED segments managed by a controller. When you signal a turn, the segments light up one after another, sweeping outward to create a chasing motion instead of a single flash. That controller (or a purpose-built harness) is what separates sequential from standard: a standard marker needs only a bulb and a wire, while sequential needs a light source designed for segmented control plus something to run the timing, as JW Speaker’s engineering team explains. That extra hardware is also why sequential kits generally cost more and take longer to install correctly.
How Do Sequential and Standard Markers Compare?
The sweeping motion of a sequential marker may draw the eye faster than a static flash, particularly in daylight or in cluttered urban traffic where a single steady blink can get lost. That is the core selling point: better perceived visibility during lane changes and turns, not just a styling upgrade. Standard markers still do their job. They meet baseline visibility requirements and have done so reliably for generations of vehicles.
Where the two diverge sharply is aesthetics, cost, and long-term reliability.
- Aesthetics: Sequential lighting reads as a deliberate, custom touch. It is the detail people notice on a truck at a stoplight. Standard markers blend in, which is exactly the point for owners who want a factory-correct look.
- Cost: A standard marker replacement is often a five-dollar bulb. A sequential setup requires an LED strip, a controller or harness, and sometimes a relay, pushing cost well beyond a simple bulb swap.
- Reliability: More electronics mean more potential failure points. A controller can fail; a bulb typically only burns out.
- Repair complexity: Standard markers are a five-minute swap almost anyone can do. Sequential systems may require diagnosing a controller, a harness pin, or a grounding issue.
Neither option is objectively “better.” It comes down to whether you value the visual and signaling upgrade enough to accept more moving parts.
Will Sequential Markers Work With My Vehicle’s Wiring?
This is where most sequential retrofits succeed or fail, and it has nothing to do with the lights themselves. It comes down to whether your vehicle’s side markers run on a 2-wire circuit or a single-wire, body-grounded circuit, and whether your marker is filament or LED.
The classic “crossfeed” trick, tying the marker wire into the turn signal circuit so it flashes, works for filament bulbs but often fails on LEDs because diodes only pass current in one direction. Crossfeed a diode-based marker the wrong way and you get flickering, dim illumination, or nothing at all, a problem Stern’s technical analysis of marker flashing breaks down in detail.
That is why compact controller modules, sometimes called PLUM-style units, are often preferred over relay hacks. A module reads the turn signal input and drives the marker output cleanly, regardless of whether the marker is a filament bulb or an LED strip, without adding a pile of relays and splices under your dash.
- 2-wire markers (power and ground run separately) are the easiest to convert; the module simply intercepts the power feed.
- Single-wire, body-grounded markers rely on the vehicle’s chassis for ground, which makes clean signal control trickier and increases the odds of an intermittent fault if the ground path is not solid.
- Purpose-built sequential harnesses, like those Wheellightexpress designs for specific platforms, sidestep both problems by matching pinouts to your vehicle instead of forcing a generic splice.
Dash errors and body control module (BCM) faults show up most often on newer trucks and SUVs where the factory computer monitors bulb resistance. Swap a filament marker for an LED without accounting for that, and the BCM may read it as a burned-out bulb. Load resistors or CAN-aware adapter harnesses solve this in most cases, though the fix depends on the platform.
Pro Tip: Before you buy anything, pull your marker housing and check whether you see two wires or one. A quick multimeter test on the single wire while someone taps the turn signal will tell you if it is powered or body-grounded, and that answer decides which retrofit path makes sense.
Is It Legal to Make Side Markers Flash?
Federal Motor Vehicle Safety Standard No. 108 permits side marker lamps to flash for signaling purposes only when they are wired in combination with a side turn signal lamp. The NHTSA’s own interpretation letter on this point makes clear that regulators are comfortable with flashing markers used this way, while flagging concern over adding arbitrary flashing lamps that could confuse or distract other drivers.
Color rules matter just as much as flash behavior. U.S. vehicles use amber lenses up front and red lenses at the rear, and state administrative codes, like Ohio’s marker lamp regulation, spell out placement requirements meant to keep signals legible to other drivers. Swapping colors or mounting a marker somewhere it was never designed to sit risks running afoul of those rules.
Placement and flash phase deserve attention too. Markers mounted near eye height for other drivers communicate more clearly than ones tucked low on a bumper. Avoid wiring sequential markers to flash in alternating phase with your turn signals. It muddies the signal instead of clarifying it. Because state rules vary on top of the federal baseline, check your own state’s code before finalizing any marker upgrade, especially if you are changing color or location.
How Do You Choose Between Sequential and Standard Markers?
Work through these steps in order, and you will land on the right call for your vehicle without guessing.
- Decide what you actually want. If the goal is styling and a more noticeable turn signal, sequential is the better fit. If you just need reliable, code-compliant illumination, standard markers do the job with far less complexity.
- Check your light source and wiring type. Confirm whether your markers are filament or LED, and whether they run 2-wire or single-wire body-ground. This alone determines which retrofit hardware you need.
- Confirm legal and placement constraints. Verify your state’s color and mounting rules, and make sure any flash behavior stays combined with your turn signal rather than running as an independent flasher.
- Budget for the right hardware. Price out a controller module or purpose-built harness, and factor in professional installation if your vehicle’s BCM monitors bulb resistance.
- Apply the rule of thumb. Choose sequential only when your wiring is compatible and your state’s rules are clear. If either checks out shaky, standard markers remain the safer upgrade.
What Should DIYers Watch for During Installation?
Bench-test every component before it goes anywhere near your vehicle. Confirm polarity and continuity with a multimeter, especially on LED strips, and use a harness or module built for your specific vehicle rather than a universal splice kit. Check your fuse rating and grounding points before you button anything up.
The most common failures share a pattern:
- Crossfeed damage from wiring an LED marker the way you would an old filament bulb.
- Poor isolation on body-grounded markers, which leads to intermittent flicker or a blown fuse down the road.
- Relay clicking with no light output, usually a sign of a grounding or polarity mismatch.
- Dash warning lights triggered when a BCM misreads LED resistance as a failed bulb.
Manufacturer-specific harnesses solve most of these problems before they start. Diode Dynamics’ installation documentation for GMC Sierra HD sequential markers shows how a proper harness exposes pinouts for direction and sequence, removing the guesswork that causes half the DIY failures out there.
Pro Tip: Mount nothing permanently until you have run the system on the bench with a 12-volt source and confirmed correct sequence direction. Fixing a reversed sequence takes thirty seconds on a bench and thirty minutes once it is bolted to your fender.
How Do You Wire a Sequential Side Marker Kit?
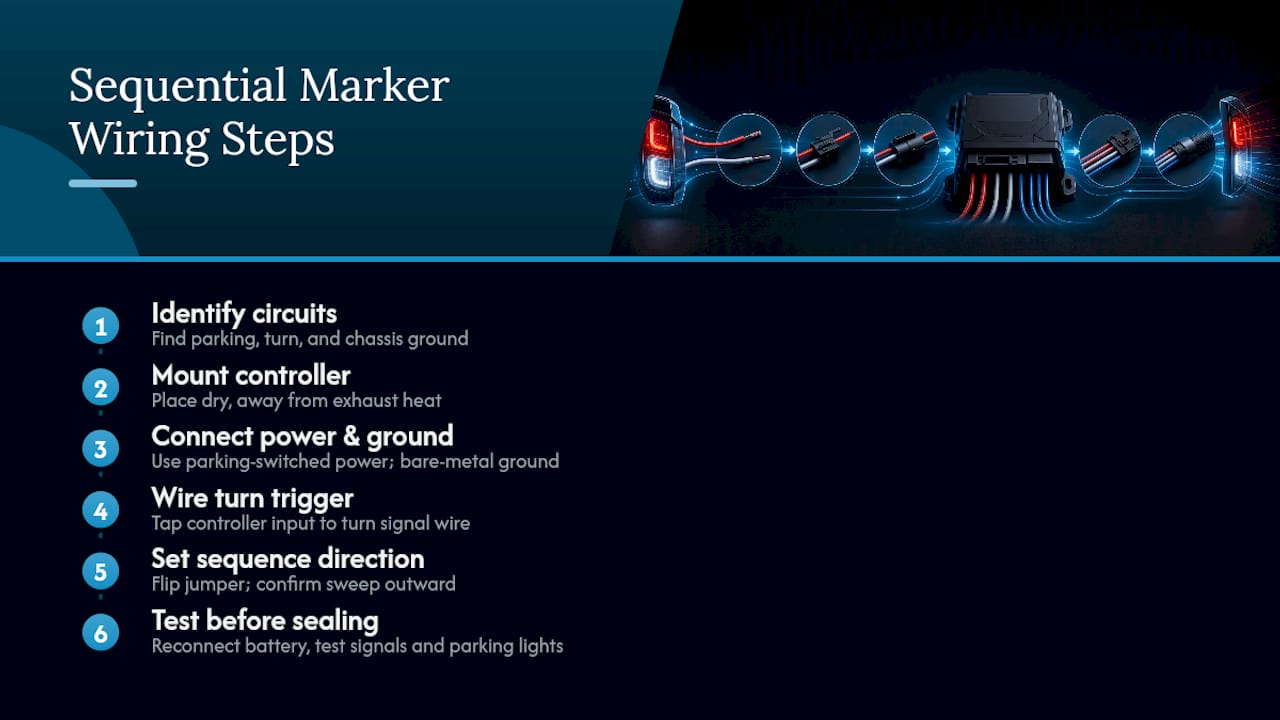
Start with the marker itself unplugged and the vehicle’s battery disconnected. Every wiring job goes faster and safer this way.
Step 1: Identify your circuits. Locate the parking light feed, the turn signal feed, and a solid chassis ground near the marker location. Label each with tape before you cut anything.
Step 2: Mount the controller or module. Purpose-built sequential harnesses typically place a small controller inline between the vehicle’s turn signal wire and the LED strip. Secure it somewhere dry and away from exhaust heat, usually behind the fender liner or inner wheel well.
Step 3: Connect power and ground. Wire the controller’s constant power lead to a parking-light-switched circuit, not directly to battery power, so the marker only illuminates when your lights are on. Run a dedicated ground wire to bare metal rather than relying on an existing body-ground point, especially if your factory setup used single-wire body grounding.
Step 4: Wire the turn signal trigger. Tap the controller’s signal input into your turn signal circuit on the corresponding side. This is the wire that tells the controller when to fire the sequence.
Step 5: Set sequence direction. Most harnesses, including the pinout style shown in Diode Dynamics’ Sierra HD guide, let you flip a connector or jumper to reverse which end lights first. Confirm the sweep moves outward, away from the vehicle’s centerline, before final mounting.
Step 6: Test before you seal anything. Reconnect the battery, cycle your turn signals and hazards, and check parking-light operation. Only after confirming correct behavior should you seal connections with heat-shrink and mount the housing permanently.
What Causes Side Marker Failures, and How Do You Fix Them?
Flickering is the most common complaint, and it almost always traces back to a bad ground. On body-grounded single-wire markers, corrosion or a loose chassis connection interrupts the circuit intermittently, which shows up as flicker at idle or over bumps. Running a dedicated ground wire instead of relying on the factory body-ground point usually eliminates it for good.
A marker that stays dark despite a good bulb or LED strip is often a polarity issue. If you crossfed an LED marker using an old-school method meant for filament bulbs, the diode may simply be blocking current in that direction. Reversing the polarity at the connector, or switching to a controller module built for LED loads, resolves this without replacing the LED strip itself.
Dash warning lights for a “bulb out” condition on an otherwise functioning LED marker point to a BCM resistance mismatch. A load resistor wired in parallel with the LED strip typically restores the resistance value your BCM expects, clearing the error.
For ongoing maintenance, inspect marker housings for condensation once or twice a year, since a compromised seal lets moisture in and accelerates corrosion at the connector. Reapply dielectric grease to connectors during any wiring work. It is a small step that prevents most of the intermittent faults enthusiasts chase for hours.
What Separates a Reliable Side Marker Kit From a Cheap One?
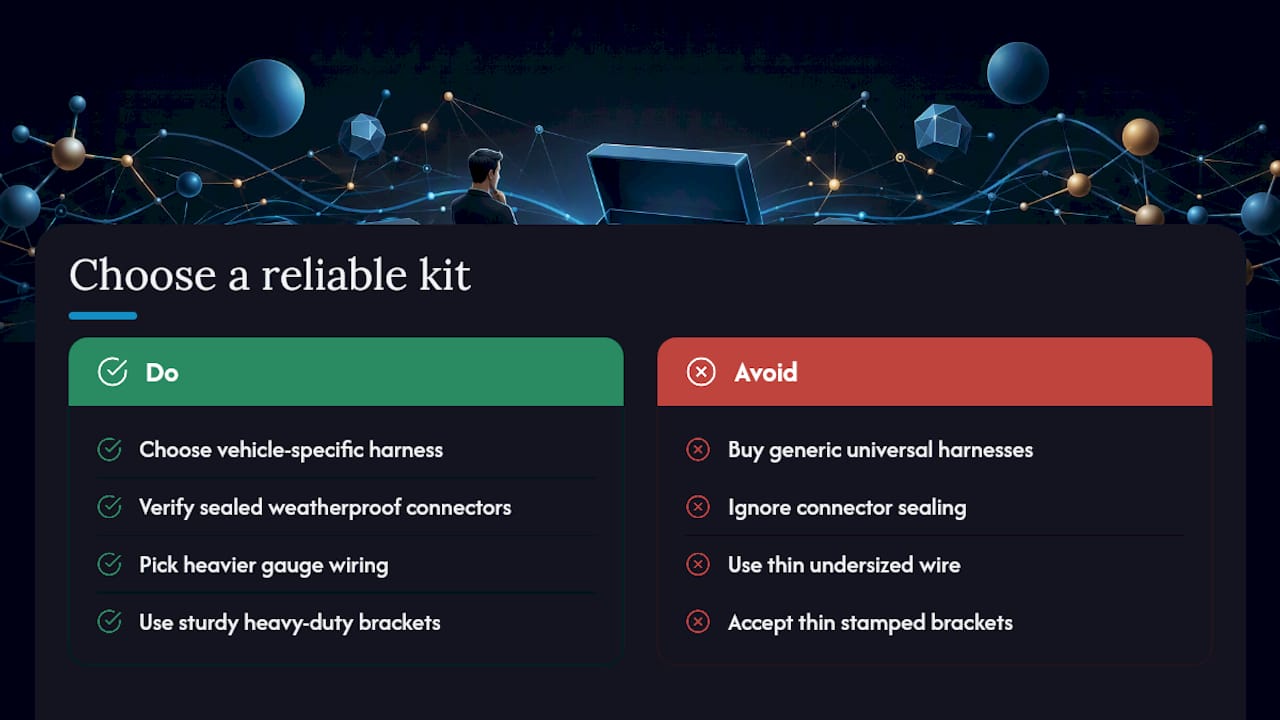
The biggest tell is whether the harness is designed for your specific vehicle or sold as a generic universal fit. A purpose-built harness, like the ones Wheellightexpress engineers for specific platforms, matches your factory pinout instead of asking you to guess which wire does what.
Beyond fitment, look for a few concrete quality signals rather than vague marketing claims. Sealed, weatherproof connectors matter more than most buyers realize, since moisture intrusion is the single biggest cause of long-term marker failure. Wiring gauge matters too: thin, undersized wire heats up under sustained LED load and degrades faster than a properly rated harness. Heavy-duty bracket material also affects longevity, since thin stamped brackets flex and crack over years of vibration on a truck or off-road rig, while a thicker bracket holds its shape.
Wheellightexpress designs its wheel lights, rock lights, portal lights, and side marker components in Louisiana rather than sourcing them overseas, using over-spec wiring harnesses and heavier brackets specifically to hold up to the vibration and weather a work truck or off-road build sees. That approach to build quality is worth checking for in any kit you consider, not just the ones this brand sells: ask about connector sealing, wire gauge, and bracket thickness before you buy, and you will avoid most of the failures that give sequential retrofits a bad reputation.
Does a Side Marker Upgrade Affect Warranty or Insurance?
Modifying your vehicle’s lighting circuit can interact with your factory warranty, though the effect depends heavily on what actually breaks. Under the Magnuson-Moss Warranty Act, a dealer cannot void your entire warranty simply because you installed aftermarket lighting. They can, however, deny a claim for a specific failure if they can show your modification caused it. Wiring a sequential marker into a BCM-equipped vehicle carelessly, and frying a body control module in the process, is exactly the kind of failure a dealer could point to.
That is one more reason to lean toward purpose-built harnesses over improvised crossfeed wiring. A clean installation that does not touch factory computer inputs beyond their intended tolerances gives a dealer far less ground to stand on.
Insurance is a separate conversation. Most personal auto policies do not require you to report cosmetic lighting changes, but altering how your turn signals or marker lamps function, particularly in a way that runs afoul of FMVSS 108 or your state’s color and placement rules, could complicate a claim if that lighting is ever cited as a factor in a collision. It is worth a quick call to your insurer if you are making a significant change beyond a straightforward marker swap, particularly on a vehicle you also use for daily driving.
A Practical Take on Sequential Retrofits
Most failed sequential installs trace back to skipping the wiring check, not to bad LEDs or weak controllers. Enthusiasts get excited about the sweep effect, order a kit, and only discover the body-ground mismatch or BCM sensitivity after something goes wrong. Confirm compatibility and your state’s rules before you spend a dollar on hardware.
Some manufacturers build harnesses and side marker products designed with heavier-duty wiring specifically so enthusiasts do not end up chasing dash errors after installation, sometimes backing purchases with a satisfaction guarantee and financing options for those upgrading a full lighting setup.
— Christopher
Where to Get a Compatible Side Marker Kit
Once you have confirmed your wiring type and checked your state’s rules, the actual sourcing decision comes down to fit and build quality. Wheellightexpress designs its side marker lights and harness adapters in Louisiana rather than importing generic kits, using over-spec wiring and heavier brackets built to handle the vibration a truck or off-road rig deals with daily.

If your factory harness is the weak link in your retrofit, a replacement wire harness built for your lighting setup removes most of the guesswork that causes dash errors and intermittent flicker. Every purchase comes with a satisfaction guarantee, and financing is available if you are upgrading your marker lights alongside a bigger lighting project like wheel lights or rock lights. Browse the side marker collection to check compatible options for your vehicle and get your kit ordered.
Sources
- MarkerFlash — Daniel Stern Lighting
- NHTSA interpretation nht76-231
- The difference between standard and sequential turn signals — JW Speaker
- Ohio Administrative Code — clearance, side-marker and parking lamps rule
FAQ
Are Sequential Side Markers Legal Everywhere?
Sequential markers are legal under FMVSS 108 when flashing is combined with a side turn signal, but color, placement, and any state-specific restrictions still apply, so check your state’s code before installing.
Can I Install Sequential LEDs on a Body-Ground Marker?
Yes, but it requires more care than a 2-wire setup. Adding a dedicated ground wire or using a controller module built for LED loads avoids the flicker and fuse problems common with body-grounded conversions.
Will Sequential Markers Trigger a Dash Warning Light?
On vehicles where the body control module monitors bulb resistance, an LED sequential marker can trigger a false “bulb out” warning. A load resistor or a CAN-aware harness typically resolves it.
What’s the Real Cost Difference Between Sequential and Standard Markers?
Standard markers cost little more than a replacement bulb, while sequential kits require an LED strip plus a controller or harness, making them a meaningfully larger investment upfront.
Does Wheellightexpress Sell Side Marker Harnesses?
Yes. Wheellightexpress designs side marker lights and replacement wire harnesses in the U.S., built to match factory pinouts and reduce dash errors during installation.