
Getting wheel lights onto your vehicle sounds straightforward until you start pulling wires and second-guessing every connection. Wheel light wiring explained properly makes the difference between a clean, safe build and a fire hazard sitting in your wheel well. The technical term you will encounter most often in professional circles is “auxiliary lighting circuit,” and understanding how that circuit works gives you the foundation for everything else. This guide covers the components, the wiring sequence, electrical safety, color compliance, and the most common mistakes people make at every stage of the process.
Table of Contents
- Key Takeaways
- Wheel light wiring explained: components and basics
- Step-by-step wiring and installation best practices
- Electrical safety: fuses, relays, and power distribution
- Color options, compliance, and what can fail inspection
- My honest take after years of DIY installs
- Get everything you need from Wheellightexpress
- FAQ
Key Takeaways
| Point | Details |
|---|---|
| Fuse placement is non-negotiable | Place your inline fuse within 6 inches of the battery to prevent fire from chafed wire shorts. |
| Relays protect your switches | Any circuit drawing more than 5 amps needs a relay to prevent switch damage and battery drain. |
| Wire routing determines durability | Attach wiring to factory looms, away from heat and suspension, to survive wheel motion and washdowns. |
| Color choices carry legal weight | Certain lamp colors can trigger inspection failures, so match your wheel light color to local regulations. |
| Planning beats technical skill | A pre-install dry run of your wire routing prevents costly mistakes before any drilling happens. |
Wheel light wiring explained: components and basics
Before you touch a single wire, you need to know what you are working with. A typical LED wheel light circuit has five main parts: the LED strips or rings themselves, the wire harness connecting them, a power source (your vehicle’s battery), a control switch or Bluetooth module, and a fuse or relay for protection.
Here is what each wiring term actually means in practical use:
- Positive lead: The wire carrying current from the battery to your lights. Always red by convention.
- Negative lead / Ground: Connects your lights back to the vehicle chassis. This completes the circuit.
- Inline fuse: A safety device in the positive lead that breaks the circuit if current exceeds a safe level.
- Relay: An electrically operated switch that lets a small control signal handle a large current load without burning out your toggle switch.
- Wire gauge: The thickness of the wire. Lower gauge numbers mean thicker wire, which carries more current safely.
Most kits connect positive to battery positive, negative to chassis ground, with an inline fuse on the positive lead as close to the battery as possible. Control options range from a simple toggle switch mounted on the dash to a Bluetooth module you operate from your phone. Bluetooth control is increasingly popular because it lets you change colors and patterns without running a switch wire through the firewall. Check the wheel light sizing guide from Wheellightexpress for specific wire gauge and fuse recommendations matched to their products.
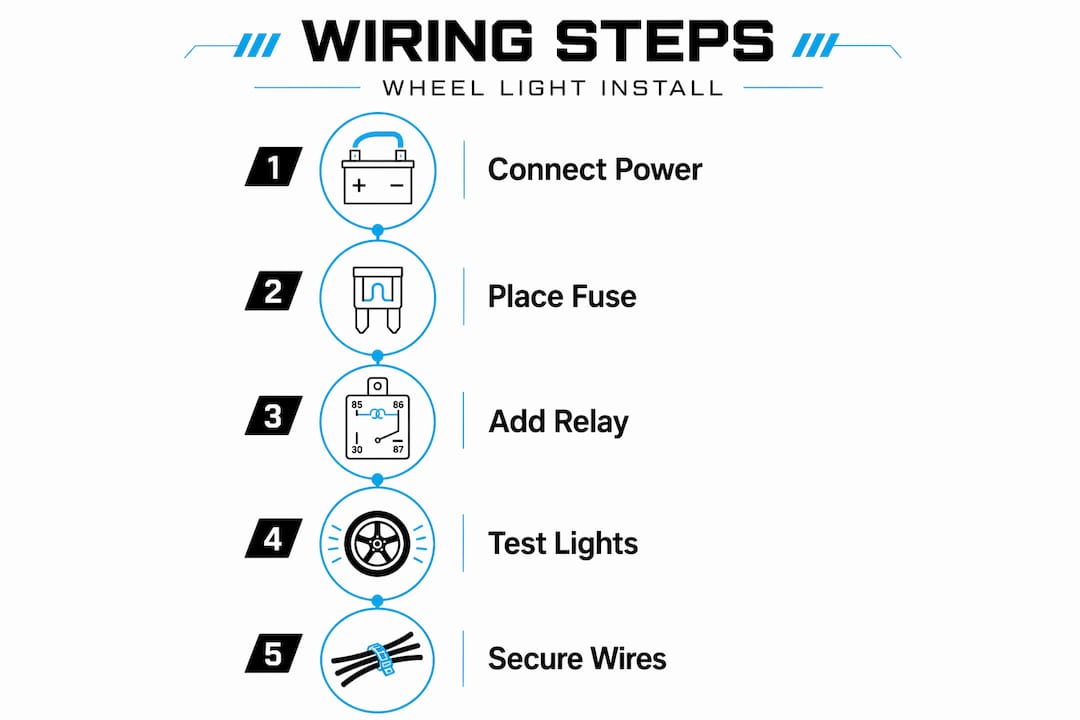
Step-by-step wiring and installation best practices
This is where most people either nail the job or create problems they will spend hours diagnosing later. Follow this sequence and you will get professional results.
- Plan your wire routing before drilling anything. Do a full dry run of routing by holding wires in place to confirm your lengths and identify any obstacles near the suspension or exhaust.
- Disconnect the battery negative terminal first. This prevents accidental shorts while you work. Do this before any drilling, cutting, or stripping of wires.
- Mount your lights in a position that avoids heat sources and moving parts. Wheel wells get hot and wet. Keep the LED strips or rings away from brake rotors and exhaust routing paths.
- Run wires along factory looms and secure with zip ties every 6 to 8 inches. Attaching to existing factory harnesses keeps your install looking clean and protects the wires from road debris and wheel movement.
- Use the correct wire gauge for your run length and load. Longer runs need thicker wire to maintain voltage. Check your kit’s specs or the sizing guide to confirm.
- Install your inline fuse within 6 inches of the battery positive terminal. This is a fire prevention rule, not a suggestion. A chafed wire anywhere downstream can cause a short, and the fuse only does its job if it is close enough to the source to break the circuit before heat builds.
- Install a relay if your total draw exceeds 5 amps. Wire the relay coil to your switch and let the relay handle the heavy current from the battery. This protects your switch and lets you use ignition-switched power to prevent battery drain.
- Seal every connection with heat shrink tubing. Wheel wells are constantly exposed to water, road salt, and pressure washing. Corrosion from water ingress can create heat spots and fire risk, so every splice needs to be fully sealed, not just taped.
- Wire your control switch or Bluetooth module before buttoning anything up. Route the switch wire through a factory grommet in the firewall if you are going hardwired. For Bluetooth modules, confirm pairing works at this stage.
- Reconnect the battery and test everything before final assembly. Check for full brightness across all four wheels, confirm the control switch works at every setting, and look for any wires that are pulling tight during suspension travel.
Pro Tip: After your test, have someone turn the steering wheel lock to lock while you watch the wheel well wiring. Any wire that tightens or rubs during full steering input needs to be rerouted before you close everything up.
The table below breaks down common control options and what each requires from your wiring setup:
| Control type | Wiring requirement | Best for |
|---|---|---|
| Toggle switch | Switch wire through firewall, relay if over 5A | Simple single-color installs |
| Remote control receiver | Power, ground, and signal wire | Multi-color kits with preset modes |
| Bluetooth module | Power and ground only, app-controlled | Color-changing and pattern kits |
| Ignition-switched relay | Relay wired to ignition circuit | Preventing lights from staying on when parked |
Electrical safety: fuses, relays, and power distribution
Getting the fuse and relay setup right is the part most DIYers underestimate. It is not just about protecting the lights. It is about protecting your vehicle.
Lighting circuits drawing over 5 amps require relay-based wiring with appropriate fuse sizing. The standard sizing breakdown works like this: use a 7.5A fuse for loads under 5A, a 15A fuse for loads between 5 and 10A, and a 25 to 30A fuse for loads between 10 and 20A. These are minimum thresholds. Going significantly larger defeats the purpose of the fuse entirely.
The relay and the fuse serve two completely different functions, and confusing them leads to dangerous setups. The fuse protects your wiring from overheating if current spikes. The relay protects your switch from high current and allows the circuit to run off ignition-switched power so the lights turn off automatically with the vehicle. You can learn more about how relays function in automotive lighting applications by reviewing relay wiring tips from sources covering auxiliary lighting builds.
Pro Tip: Treat fuse placement not as a formality but as a critical fire-suppression decision. The fuse closest to the battery protects the entire high-current lead. If a wire chafes against the frame 4 feet from the battery and there is no fuse nearby, that wire will heat up before anything blows.
Wiring all your accessories directly to battery positive with cheap individual fuses creates a messy, unsafe system. Modular relay and fuse boxes are the better approach for anyone running multiple lighting circuits. A main master fuse near the battery protects the thick main cable, while internal fuses protect each individual circuit. This setup also makes future troubleshooting dramatically easier because every circuit is labeled and accessible in one location. The replacement wire harness offered by Wheellightexpress follows this logic, giving you a purpose-built harness that handles the organization for you.
The two wiring mistakes that cause the most problems are using undersized wire on long runs (which creates resistance and heat) and skipping the fuse entirely because “the lights are small.” Neither is safe. Small LED strips can still cause a fire if a bare positive wire contacts bare metal anywhere along a 10-foot run.
Color options, compliance, and what can fail inspection
Choosing your wheel light colors is more than an aesthetic decision. The color of light your vehicle emits matters legally, and the rules vary by state.
Here is what you need to know before committing to a color:
- White and amber are the safest choices for forward-facing or side-visible lighting positions. They align with standard clearance lamp regulations in most states.
- Red should only appear at the rear of the vehicle. Red light visible from the front or sides can trigger inspection failures and draw law enforcement attention.
- Blue is heavily restricted in most states because it mimics emergency vehicle lighting. Many states ban blue entirely for civilian vehicles.
- Green, purple, and multicolor fall into a gray area that varies significantly by state. Some states allow them for off-road use only.
Clearance lamp color requirements specify amber or red in designated positions, which directly affects how you choose and position wheel lights. A wheel light visible as a forward-facing red light, for example, can fail inspection regardless of how clean the wiring is underneath.
Check the automotive LED lighting guide from Wheellightexpress for a breakdown of how different lighting types and colors interact with compliance standards. The goal is to build something that looks great and passes every time you pull in for inspection.
My honest take after years of DIY installs
I have seen enthusiasts with zero electrical background pull off cleaner installs than experienced mechanics. The difference almost always comes down to planning rather than skill. The person who spent 20 minutes doing a wire routing dry run and studying the fuse requirements rarely makes the mistakes that cost real money to fix.
What I have watched trip people up the most is skipping the inline fuse because the kit “came with one” but they installed it at the light end instead of the battery end. That fuse protects almost nothing in that position. I have also seen installs where bare butt connectors were used in the wheel well because heat shrink “seemed like overkill for LED strips.” Six months later, those connectors corrode, the connection fails, and the owner blames the lights instead of the connector choice.
The wiring in a wheel well is one of the harshest environments on the vehicle. It gets sprayed, heated, vibrated, and flexed constantly. Treat every connection like it has to survive three years of that abuse, because it does.
A well-organized wiring system with centralized fuse and relay boxes does not just make the install safer. It makes every future upgrade faster and every fault easier to diagnose. Build it right the first time. You will thank yourself the second time you open that fuse box.
— Christopher
Get everything you need from Wheellightexpress
If you have the wiring knowledge and just need quality products to match, Wheellightexpress has you covered. All products are designed in Louisiana, so you are not getting generic imported kits. You are getting gear built for the way American enthusiasts actually use their vehicles.

Browse the full aftermarket lighting collection for LED strips, wheel light rings, and complete kits that include pre-wired harnesses. If you need to replace or upgrade your existing wiring setup, the wire harness leads give you the flexibility to customize your electrical layout without starting from scratch. Wheellightexpress also offers financing options so you can get the complete setup you want without waiting. Every purchase comes with a satisfaction guarantee because quality and customer support are built into everything we do.
FAQ
What does wheel light wiring actually involve?
Wheel light wiring connects LED strips or rings to your vehicle’s battery using a positive lead, chassis ground, inline fuse, and optional relay and switch. The process follows standard auxiliary lighting circuit principles with extra attention to waterproofing and wire routing around suspension movement.
Where should the inline fuse be placed?
The inline fuse must be placed within 6 inches of the battery positive terminal. This position protects the entire positive lead from fire risk caused by shorts anywhere downstream.
Do wheel lights need a relay?
Yes, if your total circuit draw exceeds 5 amps. A relay prevents the control switch from handling high current directly and allows ignition-switched wiring that turns off the lights automatically with the vehicle.
What wheel light colors are street legal?
White and amber are the most widely accepted colors for wheel lights in street use. Red should only appear at the rear, and blue is restricted or banned in most states. Always check your specific state’s vehicle lighting laws before choosing a color.
Can improper wiring cause a wheel light to fail inspection?
Yes. Wiring faults, exposed connections, and non-compliant lamp colors can all cause inspection failures. Lights that don’t emit required colors in specified locations fail standard vehicle lighting criteria in states with formal inspection programs.