
A lighting controller is the central device that translates your commands into digital signals, directing every LED on your vehicle to change color, brightness, or animation effect. Without one, your LED strips are just static lights. With one, your build becomes a fully programmable lighting system. Whether you’re running wheel lights, underbody strips, or interior accents, understanding how a lighting controller works is the difference between a basic install and a build that turns heads at every show.
What is a lighting controller and why does it matter?
A lighting controller is the brain of any LED lighting system. It receives input from you, whether through an app, a physical console, or a pre-programmed sequence, and converts that input into precise digital commands that tell each LED what to do. The industry standard protocol behind most professional setups is DMX512, established in 1986, which transmits 512 channels per universe with values ranging from 0 to 255 per channel. That range covers everything from full off to full brightness, plus color mixing and speed control.
For automotive enthusiasts, this matters because your LED strips, wheel lights, and accent fixtures all need a single source of truth. A controller provides that. It also opens the door to custom lighting integration that goes far beyond what a basic on/off switch can do. Brands like Elation Lighting and Twinkly have built entire product lines around this concept, and the same technology now applies directly to vehicle builds.
How does a lighting controller work with automotive LED lighting?
A lighting controller works by sending a continuous stream of digital data down a cable or wireless signal to each LED fixture or strip in your system. The controller assigns each fixture a unique address, and the fixture only responds to the data packets sent to that address. This is how one controller can manage dozens of independent lighting zones simultaneously.
The three most common protocols you’ll encounter in automotive builds are:
- DMX512: The professional standard. Data travels over 3-pin or 5-pin XLR cables in a daisy-chain from the controller to each fixture. Each fixture reads its assigned channel block and ignores the rest.
- SPI (Serial Peripheral Interface): Common in addressable LED strips like WS2812B. The controller sends pixel-level data directly to each LED chip in sequence. No XLR cables needed. This is the protocol behind most color-chasing wheel light effects.
- Wireless (Bluetooth/Wi-Fi): App-based controllers use your phone as the interface. The controller receives commands over Bluetooth or Wi-Fi and converts them to the appropriate signal for your strips.
Channel assignment and addressing
DMX addressing works like a mailbox system. Every fixture gets a unique starting address, and the controller sends data to that address. If two fixtures share the same address, they respond identically, which is one of the most common causes of apparent controller failure in DIY builds. Setting addresses correctly before powering up your system prevents this entirely.
Termination and signal integrity
Signal termination is the step most beginners skip. A DMX terminator is a low-cost XLR plug with a resistor inside that absorbs the signal at the end of the chain. Without it, the signal bounces back and causes flickering or total data failure. This applies to any DMX-based automotive setup.
Pro Tip: Always install a DMX terminator at the last fixture in your chain. It costs almost nothing and prevents hours of troubleshooting flickering lights.
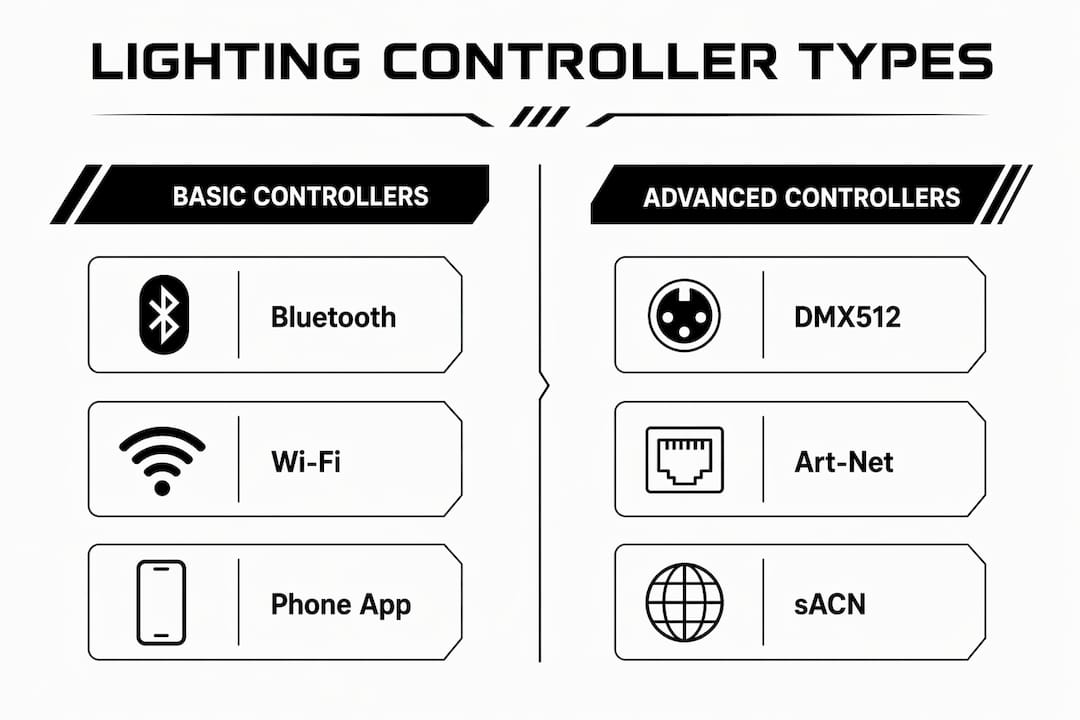
What are the main types of lighting controllers?
Lighting controllers fall into three clear categories based on complexity, protocol support, and the scale of the LED system they manage.
| Controller Type | Protocol Support | LED Capacity | Best For | Complexity |
|---|---|---|---|---|
| Bluetooth/Wi-Fi App Controller | Wireless, SPI | Low to medium | Simple color changes, basic effects | Beginner |
| DMX512 Hardware Controller | DMX512 | Up to 512 channels per universe | Multi-zone builds, shows | Intermediate |
| Art-Net / sACN Network Controller | Art-Net, sACN, DMX | 1,400+ addressable LEDs per port | Large pixel-mapped builds | Advanced |
Bluetooth and Wi-Fi controllers are the entry point for most DIYers. They connect to a phone app, require no cable runs, and handle basic color selection and effect playback well. The trade-off is limited programming depth and no scene storage in most budget models.
DMX512 hardware controllers step up the capability significantly. They support multiple universes, store scenes and cues, and give you real-time fader control over every channel. For a vehicle with wheel lights, underbody strips, and interior zones running simultaneously, a DMX controller is the right tool.
Art-Net and sACN controllers operate over Ethernet or Wi-Fi and support massive pixel counts. Professional controllers in this category can handle 1,400 or more addressable LEDs per port. For most automotive builds, this level of capacity is beyond what you need, but it becomes relevant for show trucks, parade vehicles, or competition builds with full pixel-mapped body panels.
What features should you look for in a lighting controller?
The features that separate a good controller from a frustrating one come down to programming depth, compatibility, and capacity for growth.
- Scene and cue storage: A well-configured lighting controller stores scenes for instant recall, so your show-mode sequence fires with one button press instead of manual adjustment every time. This is where automation delivers real value beyond visual effects.
- Effect engine: Built-in effects like chases, strobes, color fades, and pixel mapping save programming time. Controllers with a strong effect engine let you build complex animations without writing code.
- Channel capacity: Advanced fixtures can use dozens of channels per fixture. A controller with only one universe (512 channels) fills up fast in a large build. Count your channels before you buy.
- Real-time control interface: High-end controllers use motorized faders or touchscreen interfaces for live adjustments. This moves you from static programming to dynamic live control during events or shows.
- App and remote compatibility: For automotive use, wireless control is practical. Look for controllers that pair with a reliable app and also support a physical remote as a backup.
- LED strip and fixture compatibility: Not every controller works with every strip type. Confirm the controller supports your specific LED protocol, whether that’s SPI, DMX, or PWM, before purchasing.
Pro Tip: Buy a controller with at least double the channel capacity you need today. Builds always grow, and upgrading your controller mid-project costs more time and money than buying the right one upfront.
How to set up a lighting controller in your vehicle
Setting up a lighting controller correctly from the start saves hours of troubleshooting later. Follow these steps for a clean, reliable install.
-
Identify your protocol. Check your LED strips or fixtures and confirm whether they run on SPI, DMX, or PWM. Your controller must match. Mixing protocols without a converter causes complete signal failure.
-
Plan your zones and channel count. Map out every lighting zone in your vehicle. Assign a channel block to each zone. For DMX, calculate the total channels needed and confirm your controller has enough capacity across its universes.
-
Assign unique DMX addresses. Set each fixture’s starting address on its physical DIP switches or menu. Address conflicts cause fixtures to mirror each other, which looks like a controller malfunction but is actually an addressing error.
-
Wire your data chain. Run your XLR cables or SPI data lines from the controller output to the first fixture, then daisy-chain to each subsequent fixture. Keep data cables away from power cables to reduce interference. For automotive installs, use quality wire harness components to keep connections clean and protected.
-
Install the terminator. Plug a DMX terminator into the output of the last fixture in the chain. This single step prevents the majority of flickering and data errors in DMX setups.
-
Program your scenes. Start with simple scenes: a static color, a slow fade, a chase effect. Test each zone independently before building complex cues. Save each scene to the controller’s memory so it recalls instantly.
-
Set up triggers. Many controllers support external triggers, such as a button press, a music beat, or a vehicle speed signal. Map your most-used scenes to triggers for hands-free operation while driving.
-
Test and troubleshoot. Power up the system and check each zone. If a fixture doesn’t respond, check its address first. If it flickers, check termination. If colors are wrong, verify the channel mode matches the controller’s output settings.
For a deeper look at how these steps apply to specific LED strip types, the LED strip setup guide from Wheellightexpress covers protocol-specific wiring in detail.
Key takeaways
A lighting controller is the single most important component in any automotive LED build because it determines what your lights can actually do, not just whether they turn on.
| Point | Details |
|---|---|
| Core function | A lighting controller converts user input into digital signals that control color, brightness, and effects. |
| Protocol matters | Match your controller protocol (DMX512, SPI, or wireless) to your LED strips before purchasing. |
| Address every fixture | Assign unique DMX addresses to prevent fixtures from mirroring each other unintentionally. |
| Always terminate | Install a DMX terminator at the end of the chain to prevent flickering and signal errors. |
| Buy for future capacity | Choose a controller with more channel capacity than your current build requires. |
Why I always tell builders to buy the controller first
Most builders pick their LED strips first and then look for a controller that fits. That’s the wrong order. The controller defines what your entire system can do. Choosing it last means you often end up with a mismatch between what your strips can handle and what your controller can deliver.
I’ve seen builders spend serious money on high-density pixel strips and then pair them with a basic Bluetooth module that can only run pre-set effects. The strips are capable of full pixel mapping. The controller limits them to a color wheel. That’s a frustrating and expensive mistake.
The other thing I’d push back on is the idea that cheap controllers are “good enough to start.” They’re not. A controller with no scene storage, no channel expansion, and a poorly designed app will make you hate your own build. The real power of customization in automotive lighting comes from programming depth, not just having colorful lights. A controller that stores scenes, supports multiple zones, and gives you live control is what separates a show-quality build from a novelty install.
Start with a controller that has room to grow. Learn the addressing. Learn the scene programming. The creativity that opens up once you understand your system is worth every hour you put into it.
— Christopher
Wheellightexpress has the hardware to back your build
Building a vehicle lighting system starts with the right components, and Wheellightexpress designs every product specifically for automotive enthusiasts. From LED strips to wire harnesses, every piece is built and designed in Louisiana with quality you can count on.
Wheellightexpress carries a full range of aftermarket lighting products including LED strips, wire harnesses, and lighting accessories built for real vehicle installs. Whether you’re wiring up wheel lights or building out a full multi-zone system, you’ll find the components you need without hunting across multiple suppliers. Financing options are available, so you can get the quality hardware your build deserves without waiting.
FAQ
What does a lighting controller do in a vehicle?
A lighting controller sends digital signals to your LED strips and fixtures, directing color, brightness, and animation effects. It acts as the command center for your entire vehicle lighting system.
What is DMX512 and do I need it for automotive lighting?
DMX512 is a professional lighting protocol that transmits 512 channels of control data per universe. You need it for multi-zone builds with complex programming requirements; simpler builds can use SPI or wireless controllers instead.
Why are my LED lights flickering after I connect the controller?
Flickering in a DMX system almost always means the signal chain is not terminated. Install a DMX terminator at the last fixture in the chain to absorb the signal and stop the bounce.
How many channels does my lighting controller need?
Count the total channels your fixtures require, including all zones and effects channels, then choose a controller with at least double that capacity. Advanced fixtures can use dozens of channels each, so capacity runs out faster than most builders expect.
Can I control automotive LED lights from my phone?
Yes. Bluetooth and Wi-Fi app controllers connect directly to your phone and handle color changes and basic effects well. For complex scene programming and multi-zone control, a dedicated hardware controller gives you significantly more capability.
Recommended
- Custom Lighting Integration Explained for Car Enthusiasts – Wheel Light Express
- Sequential Lighting How It Works: A DIY Car Guide – Wheel Light Express
- LED Strip Applications for Custom Vehicles: 2026 Guide – Wheel Light Express
- Lighting Best Practices for Custom Automotive Builds – Wheel Light Express