
The lighting layering technique is defined as the practice of combining ambient, task, and accent lighting into a single, coordinated system to improve both visual depth and function. For vehicle owners and automotive enthusiasts, this approach transforms a flat, single-source setup into a multi-dimensional lighting experience. The 3-tier rule allocates 50–60% of lumens to ambient, 20–30% to task, and 10–20% to accent lighting. Applied to automotive builds, this standard gives you independent control over mood, visibility, and style in a way that a single overhead light simply cannot.
What is lighting layering technique and how does it work in vehicles?
Layered lighting, the recognized industry term for what is lighting layering technique in practice, is a fundamental mindset shift from uniform illumination to human-centric design. It acknowledges that light direction, intensity, and contrast all serve different purposes at the same time. A single dome light treats every moment the same. A layered system does not.
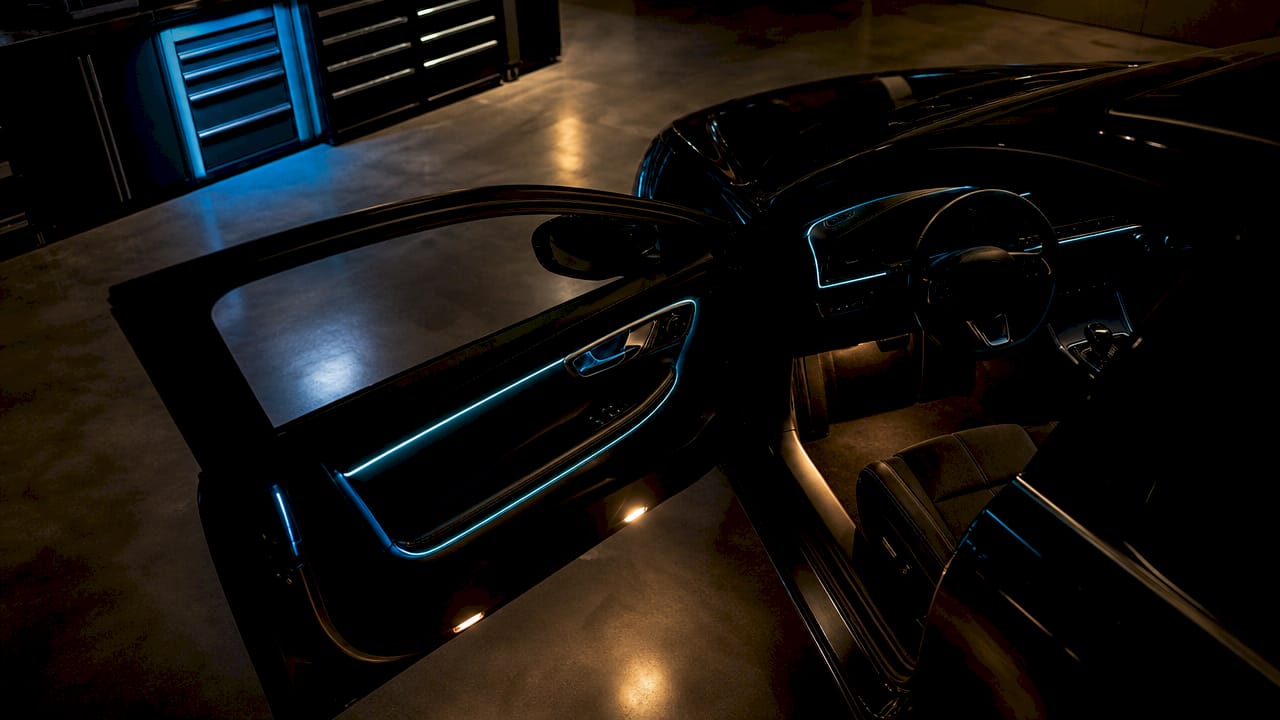
In automotive contexts, layered lighting means your interior ambient glow, your map reading light, and your wheel well accent strips all operate as separate, controllable layers. Each one has a job. Each one can be adjusted without affecting the others. That independence is what gives layered lighting its power over a vehicle’s atmosphere and usability.
Successful lighting design balances engineering, meaning measurable lux levels for safety, with artistry, meaning the interplay of light, shadow, and reflection. Getting both right is what separates a professional-looking build from a wiring project that just happens to glow.
What are the three layers and their roles in automotive lighting?
Each layer in a vehicle lighting setup serves a distinct purpose. Understanding all three prevents the most common mistake enthusiasts make: installing lights without a plan for how they interact.
Ambient lighting is the base layer. It provides general, low-level illumination across the interior or exterior of the vehicle. Common sources include:
- Overhead LED strips running along the headliner
- Footwell lights mounted low on door sills
- Underbody glow strips for exterior ambient effect
Ambient light must never run at full brightness alone. Dimming to 20–40% intensity prevents the flat, utility look and creates the atmosphere that makes a layered setup feel intentional rather than functional.
Task lighting is the functional layer. It targets specific activities: reading a map, checking the center console, or working near the vehicle at night. Reading lights, cargo area LEDs, and under-hood work lights all fall into this category. Task lighting should be bright, focused, and positioned to reduce eye strain.
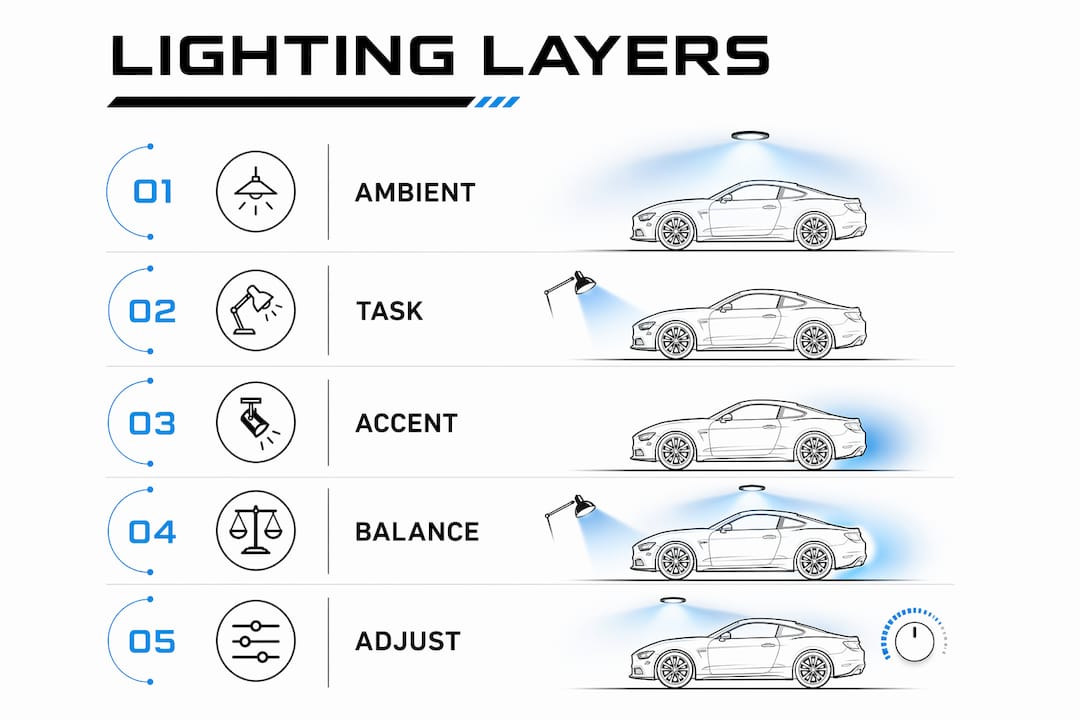
Accent lighting is the visual layer. It highlights specific features, such as wheel wells, door panel contours, or dashboard trim. Accent lighting should be approximately 3 times brighter than the ambient layer to create the visual pop that gives a layered setup its depth. That ratio is what makes accent strips look intentional rather than decorative afterthoughts.
Pro Tip: Position your accent strips at a different height or angle than your ambient source. Lighting at varied heights adds vertical dimension and eliminates the flat look that single-level setups produce.
How to apply the 3-tier rule to your automotive lighting setup
The 3-tier rule gives you a measurable framework for distributing light across your vehicle. It prevents overlighting one layer while neglecting another.
| Layer | Lumen Share | Typical Automotive Application | Brightness Target |
|---|---|---|---|
| Ambient | 50–60% | Headliner strips, footwell LEDs, underbody glow | Low to medium, dimmable |
| Task | 20–30% | Map lights, cargo LEDs, under-hood work lights | Medium to high, focused |
| Accent | 10–20% | Wheel well rings, door trim strips, dash accents | High, approximately 3x ambient |
Applying these proportions starts with estimating your total lumen output across all installed lights. If your full interior setup produces 1,000 lumens total, roughly 500–600 lumens should come from ambient sources, 200–300 from task lights, and 100–200 from accent strips. These are targets, not hard limits, but staying close to them produces a balanced result.
For exterior builds, the same logic applies. Wheel well accent rings contribute to the accent layer. Underbody strips serve the ambient exterior layer. A focused reverse or work light serves the task layer. Designers prefer replacing one large fixture with multiple smaller light sources to transform a space more effectively than a single high-output unit can.
Pro Tip: Use a lumen calculator or a basic photometric tool like DIALux to verify your lux levels before finalizing your install. This prevents overlighting and keeps glare ratings low for a professional finish.
What are the benefits of lighting layering for vehicle aesthetics and function?
Layered lighting improves vehicle aesthetics and function in ways that single-source setups cannot replicate. The benefits are practical, measurable, and visible.
- Visual depth and dimension. Multiple light sources at different positions create contrast and shadow. That contrast is what makes a vehicle interior look designed rather than lit.
- Independent mood control. You can dim the ambient layer for a relaxed cruise while keeping task lights bright for navigation. No single switch controls everything.
- Improved safety. Focused task lighting reduces eye strain and improves visibility for activities inside and around the vehicle at night.
- Feature emphasis. Accent strips on wheel wells or door panels draw attention to the vehicle’s lines and custom components.
“Multiple lighting layers improve atmospherics and perceived quality by up to 20% compared to single-source lighting systems.”
That 20% improvement reflects how strongly light quality affects the way people experience a space, or a vehicle. A well-layered build feels more premium, more intentional, and more personal than one that simply adds brightness.
For automotive enthusiasts who invest in custom lighting integration, layering also adds long-term flexibility. You can upgrade one layer at a time without rebuilding the entire system. That modularity makes layered setups a smarter long-term investment than a single-source overhaul.
What are the steps to implement lighting layering in your vehicle?
A structured approach prevents the most common installation mistakes. Follow these steps to build a layered system that looks and performs like a professional build.
-
Assess your current setup. Identify what lighting you already have and which layer it belongs to. Most stock vehicles have ambient overhead lighting and basic task lights. Accent lighting is almost always absent from factory builds.
-
Define your goals by layer. Decide what you want each layer to do. Do you want a relaxed ambient glow for the interior? Bright task lighting for the cargo area? Accent strips on the wheel wells? Write it down before buying anything.
-
Choose the right LED type for each layer. Warm white LEDs (2,700–3,000K) work well for ambient layers. Cool white or daylight LEDs (5,000–6,500K) suit task lighting. RGB or color-tunable strips give accent layers maximum flexibility for mood and style.
-
Build in dimmability and independent controls. Each layer needs its own switch or dimmer. Wiring all three layers to a single switch eliminates the core benefit of layering. A wire harness system with independent leads makes this straightforward.
-
Validate your output before finalizing. Check that accent strips are visibly brighter than your ambient layer. Most spaces need 4–5 light sources across all three layers to achieve a designer-grade result. Smaller vehicle interiors can succeed with three well-placed sources.
-
Control glare. Mount accent strips so they illuminate surfaces rather than shine directly into eyes. Low Unified Glare Rating (UGR) placement keeps the setup comfortable and professional.
Pro Tip: The most common mistake in automotive layering is neglecting the accent layer entirely. Enthusiasts often install ambient and task lights, then stop. Without accent lighting, the setup lacks the contrast and depth that makes layered lighting visually compelling.
For a deeper look at how these principles apply to full builds, the lighting best practices guide from Wheellightexpress covers installation specifics for custom automotive projects.
Key Takeaways
Layered lighting in vehicles requires three independent layers, ambient, task, and accent, distributed at the 50/30/20 lumen ratio to achieve professional visual depth and functional control.
| Point | Details |
|---|---|
| Three-layer structure | Ambient, task, and accent lighting each serve a distinct role and must be controlled independently. |
| 3-tier lumen rule | Allocate 50–60% ambient, 20–30% task, and 10–20% accent to balance brightness and atmosphere. |
| Accent brightness ratio | Accent lighting should be approximately 3 times brighter than ambient to create visible depth. |
| Dimmability is required | Ambient lighting dimmed to 20–40% intensity prevents a flat, utility look and creates atmosphere. |
| Validate before finishing | Use photometric tools or a lumen calculator to confirm layer balance and control glare. |
Why layering changed how I think about vehicle lighting
I spent years watching enthusiasts bolt on LED strips and wonder why the result looked like a hardware store rather than a custom build. The answer was almost always the same: they had light, but no layers.
The shift from single-source to layered thinking is not about adding more lights. It is about giving each light a specific job. When I started applying the 3-tier rule to automotive builds, the difference was immediate. The accent layer alone, when set at roughly three times the ambient brightness, changed the entire character of the interior. It stopped looking like a lit space and started looking like a designed one.
What I find most underrated is the dimmability piece. Enthusiasts focus on color and brightness, but the ability to drop your ambient layer to 20% while keeping accent strips at full output is what creates the atmosphere that makes people stop and look. That control is what separates a finished build from a work in progress.
The types of bold automotive lighting available today make this more accessible than ever. The technique is not new. Applying it consistently to vehicles is.
— Christopher
Wheellightexpress products built for layered lighting builds
Wheellightexpress designs every product in Louisiana specifically for automotive enthusiasts who want original, quality results. Their product line covers all three lighting layers in a single catalog.
The Wheel Light Ring and Strip delivers the accent layer that most factory builds are missing. For vehicles that already have strips installed, the replacement wheel light strip makes upgrading straightforward. Wheellightexpress also offers high-density interior lights for enthusiasts building out their ambient layer. Every product ships with a satisfaction guarantee, and financing options make it easy to build your full layered setup without paying for everything upfront. If you want to see how vehicle customization and lighting work together, the team at NJ Vinyl Wrapz covers the full picture of appearance upgrades in their 2026 guide.
FAQ
What is the lighting layering technique in simple terms?
The lighting layering technique is the practice of combining ambient, task, and accent lighting into one coordinated system. Each layer serves a different purpose and can be controlled independently for both function and style.
How many light sources do I need for a layered vehicle interior?
Most vehicle interiors achieve a designer-grade result with 4–5 light sources spread across all three layers. Smaller interiors can succeed with as few as three well-placed sources.
What is the correct brightness ratio for accent lighting?
Accent lighting should be approximately 3 times brighter than your ambient layer. That ratio creates the visual contrast and depth that makes a layered setup look intentional.
Why does dimmability matter in layered lighting?
Dimming your ambient layer to 20–40% of full brightness prevents a flat, utility appearance and allows the accent and task layers to stand out. Without dimmability, all three layers compete at the same intensity.
Can I add layered lighting to a stock vehicle?
Yes. Most stock vehicles already have an ambient layer and basic task lights. Adding accent strips, such as wheel well rings or door trim LEDs, and wiring them to an independent control completes the three-layer system.
Recommended
- Lighting Best Practices for Custom Automotive Builds – Wheel Light Express
- Sequential Lighting How It Works: A DIY Car Guide – Wheel Light Express
- LED Strip Applications for Custom Vehicles: 2026 Guide – Wheel Light Express
- Custom Lighting Integration Explained for Car Enthusiasts – Wheel Light Express